Moist Carrot Cake

Baked and styled by Mila and Viktor.

Baked and styled by Mila and Viktor.

This is one of those cakes that doesn't last very long in our household.  It is easily eaten for breakfast, snack time, and for dessert. 

My kids are starting to get their hands involved, not only on the cooking front but on styling ideas and taking pictures of food.  This is their first project together from beginning to end.  It was an all day affair which kept them busy.  I turned a blind eye to my messy kitchen and devoured one of the most delish carrot cakes ever.

CarrotCake4.jpg

Moist Carrot Cake

INGREDIENTS

  • 4 eggs
  • 1 1/4 cups vegetable oil
  • 1 cup brown sugar
  • 2 teaspoons vanilla extract
  • 2 cups all-purpose flour
  • 2 teaspoons baking soda
  • 2 teaspoons baking powder
  • 1/2 teaspoon salt
  • 2 teaspoons ground cinnamon
  • 3 cups grated carrots
  • 1 cup chopped pecans, walnuts, or Brazil nuts (optional)


INSTRUCTIONS

In a large mixing bowl, beat together the eggs, oil, sugar, and vanilla extract.

Then gradually mix in the flour.  Add the baking soda, baking powder, salt and cinnamon.

Stir in the carrots and then fold in your nuts (optional).

Preheat oven to 350°F (175° C).

Pour the batter a little more than halfway into a loaf pan or a round baking pan.   I have a silicone loaf pan so I don't need to grease my mold.

Bake for 40 minutes and check by inserting a knife to see if it pulls out cleanly.

I use a 9.6 x 4 inch mold.  I get two carrot loaves out of this recipe.


Heart Shaped White Chocolate with Black Sesame Filling

This is a simple and fun recipe to make with kids by converting a chocolate bar into fun heart shaped chocolates.  

My kids and I paired white chocolate with black sesame filling and loved the black grit that's left behind in the teeth.

We love wrapping them up in transparent bags tied with a pretty ribbon around it and offering it to friends.

White Chocolate with Black Sesame Filling
 

INGREDIENTS

• 1 bar white chocolate
• black sesame paste

INSTRUCTIONS

If you have a double boiler, go ahead and melt your white chocolate.  I don't have one so I use a heat-proof mixing bowl over a saucepan of boiling water to melt my chocolate.  Make sure the bowl fits snugly and doesn't touch the bottom of the saucepan. 

Fill each heart shaped mold a little less than halfway with the melted chocolate. 

Use the back of the teaspoon to coat the sides of the mold with chocolate.   Finish up coating the bottom and sides of the heart molds and then place it in the refigerator for 10-15 minutes.

After the chocolate has hardened into place, fill the center with the black sesame paste.  Be careful not to overfill.

Cover the filling with the rest of the melted white chocolate and place it back in the fridge for another round of 10-15 minutes.

When hardened up, pop the chocolates out of the mold.  Let it sit at room temperature before serving.


Vegetable Filled Tofu Pockets- Inari Sushi

When I was a kid, this was one of my favorite things to eat.  Although I must admit my choice in toppings back then were not quite the same as today.  Abura age is a slightly sweetened, fried tofu pocket that is usually found vacuum packed or in tins and is used for inari sushi.  You can find this easily in any Japanese or other Asian food market.


I enjoy inari sushi without rice and just fill my tofu pockets up with veggies nowadays.  If you are using rice, fill the tofu pocket a little less than half way maximizing most of the pocket with fresh vegetables so that you can optimize on all its nutritional value.

There are plenty of toppings for you to choose from.  You can add shrimp, smoked salmon, fish roe, crab, ground meat, etc. to your list of toppings.  Just balance it out with some colorful veggie so that it pops out and is inviting to eat!

Vegetable Filled Tofu Pockets—Inari Sushi

INGREDIENTS//Yields 16

• 1 pack of abura age (slightly sweetened tofu pouches)
• 1 1/2 cup rice, Japanese sushi rice, uncooked (optional)
• 1 egg, yolk only
• 1 small cucumber, diced
• 1 zucchini, julienned or spiraled (think zoodle!)
• 1 carrot, julienned or spiraled
• 1 red pepper, diced
• 1 tin corn, small
• 150 grams edamame beans
• 1/2 avocado smash with yuzu and poppy seeds

PREPARATION

To prepare the egg omelette, we use only the yolk.   Seperate the egg white from the yolk in a small bowl.
Give the yolk a quick stir (optional- you can add a smidgeon of sugar to this mix).  Heat up your skillet, add a little bit of butter to the surface and pour your yolk in the skillet.  Cook for about a minute on each side and slide it off onto a flat cutting board.  Slice across your flat yolk omelette horizontally and vertically a few times to cut them into strips.  Kitchen shears come in handy for this too. 
 

INSTRUCTIONS

If you are using rice, cook it first and then let it cool down.  You can add a little bit of sushi vinegar to it if you like but I find that the abura age is sweet enough.

Prepare all your vegetables and egg and line them up in a bowl.

Open a tofu pocket up, and using wet hands ball up a small portion of rice and place it into the base of the pocket.

Complete the top up with your choice of vegetable fillings.


NOTE

For any leftover veggies, I just simply cut them up and prepare a small salad on the side.


Chard and Kale Chips

This is not something I would normally make but given its popularity over the past few years and then seeing the cost of a 35 gram bag (6 euros!—Well ok, 5.99 euros but still... ) at the Veggie World trade fair recently, I thought I would give it a go and make it myself.

I'm not quite convinced on these chard and kale chips but I suppose it's a great option for those looking for something healthier than regular potato chips.  Though there's no comparison since potatoes, kale, and chard don't taste the same anyways.  If you are going for the crunch factor then I suppose these offer a healthier crunch.

It seems like the more I eat them, the more I enjoy them or perhaps I am subconsciously telling myself that since I am the only person in the family eating them.  To be fair, my husband hasn't tasted them yet and my eldest is away on a class trip.  So that just leaves my youngest and me.  Viktor was more amused by the fact that he was eating a feuille, a leaf that is.  He is entertained in thinking he has eaten a leaf from a tree.

It's on my list to make in the future and to place it along side with other dips and tidbits during apéro with friendsthen I will know if it is well-received or notKeep ya posted!

Chard and Kale Chips

INGREDIENTS

• 1 cup or 50 grams kale
• 2 leaves swiss chard

FLAVORING FOR KALE

• 1 teaspoon sesame oil
• 2 cloves garlic, minced
• 1/2 teaspoon mustard
• 1/2 teaspoon of tamarind paste
• 1 teaspoon lemon juice
• 5 grams roasted buckwheat
• coarse sea salt (according to taste)

FLAVORING FOR CHARD

• 1/2 teaspoon olive oil
• 5 grams fried onions
• coarse sea salt (according to taste)


INSTRUCTIONS

Wash your chard and kale leaves, then make sure they are completely dried off.

For flavoring the kale:

In a medium size mixing bowl, combine all the ingredients except for the buckwheat and and salt for flavoring the kale.

Add the kale and rub in the flavored sauce making sure to coat it well.

Then add in the buckwheat and the salt and toss it around.

On a baking tray with parchment paper, lay out each leaf of kale making sure it has its own space.

Place it in the oven at 135° Celsius for 30 minutes with a convection setting if you have one.

Take it out of the oven and let it cool before serving.

For flavoring the chard:

Add all the ingredients in a medium size mixing bowl.

Add your cut up chard leaves and rub in the flavored sauce making sure to coat the leaves well.

Be sure your chard leaves are big enough so that they lay flat and that thefried onions and salt can sit on it.

Line your baking tray with parchment paper and lay out each leaf side by side.

Place it in the oven at 135° Celsius for 30 minutes with a convection setting if you have one.

Take it out of the oven and let it cool before serving.


NOTE

I don't have a food dehydrator, so baking these chard and kale leaves in the oven in low heat and over a long duration of time is another way to dehydrate food.


Avocado Smash with Yuzu and Poppy Seeds

Yuzu is a citrus fruit that is the size of a mandarin.  It resembles a small grapefruit with uneven skin and is usually yellowish to greenish in color.  It's tart in taste with a delicate accent of grapefruit and lime-like flavors.

Yuzu originates from East Asia and is most commonly cultivated and used in Japan.  It is not eaten like a whole fruit but the juice and the zest are widely used in Japanese and Korean cuisine.  Similar in use as that of the lemon it can be found in pastries, teas, jams, dressings, sauces, beers, etc. 

Try replacing lemon with a dash of yuzu for something different.  It's subtle on the palate and less citrusy.

YuzuAvocadoPoppySeed3.jpg

This is a great simple twist to plain avocado using yuzu juice in place of lemon juice.  Don't forget to sprinkle some poppy seeds for some added texture and decoration.

Avocado Smash with Yuzu and Poppy Seeds

INGREDIENTS//Serves 2-3

• 1 ripe avocado
• 1/2 teaspoon of yuzu juice, concentrated
• 1/2 teaspoon poppy seeds
• 1/2 clove garlic (small clove)
• a pinch of coarse sea salt (adjust according to taste)


INSTRUCTIONS

Halve your avocado and scoop out the flesh with a spoon and place it in a small bowl.

Add your yuzu juice and garlic.

Start to mash the avocado with the back of a fork.  Make sure not to mash it up too much.  It's nice to have bits and chunks in it.

Add your salt and your poppy seeds. Give it a final whirl in the bowl.

I used an ice cream scooper to give this avocado some shape. 

Plop it on a plate and it's ready to be served.


Buddha Bowl #1. Eat Bold and Bloom.

Buddha bowls have been the rage in healthy living in the past year or two.  I never knew what I had been eating actually had a name to it.  I like to think of it as a gratitude bowl.  Now, I'm not trying to get hippy-dippy on you, but it is a bowl of goodness for your health, mind, and body so we should be grateful for what we have on this earth and for what Mother Nature gives to us.

Brown rice and quinoa mix topped with hijiki tofu patties, beetroot, cucumber wakame sunomono, red cabbage, spinach, crushed avocado with yuzu and poppy seeds, and carrot ginger dressing.

Brown rice and quinoa mix topped with hijiki tofu patties, beetroot, cucumber wakame sunomono, red cabbage, spinach, crushed avocado with yuzu and poppy seeds, and carrot ginger dressing.

This is a one meal bowl with an emphasis on plant based foods.  There are 4 basic components to it: grains and/or nuts and seeds, protein veggies, starchy vegetables, and a dazzling dressing or sauce.

You can use plant based proteins such as avocado, beans, nuts, seeds, and tofu.  Other protein substitutes may be egg, sustainable fish and lean meats (for those who need a little more).  Play around with the textures of your veggies which can easily be achieved by the way you cook them (boiled, steamed, sautéed, raw, roasted) or cut them (diced, cubed, sliced, julienned). 

The combination between texture and taste is something you can be mindful to while eating.  A mix of raw vegetables and lightly cooked, steamed, or roasted vegetables add different dimensions to a bowl.  Be generous to yourself and be abundant in your veggie servings.

What's great about it is that you can reincarnate any leftovers and recreate new bowls. 

Buddha Bowl #1

INGREDIENTS// 1 meal bowl

• brown rice and quinoa mix
hijiki tofu patties
• beetroot, raw and grated
cucumber wakame sunomono
• red cabbage, marinated
• spinach or chard
crushed avocado with yuzu and poppy seeds
carrot ginger dressing


INSTRUCTIONS

Choose a special bowl and assemble all your elements of goodness on top and around your grains.

Top it off with your special dressing or sauce. 

Eat bold and bloom.


Cucumber Wakame Sunomono

CucumberWakameSunomono2.jpg

Wakame is a delicious seaweed often found in soups, salads, and side dishes in Japanese cuisine.  It is rich in vitamins and minerals, notably: calcium, magnesium, iodine, riboflavin, folate, vitamins A,C,E,K—all the stuff that's good for the bones, energy production, muscle contraction, iron metabloism, and for pregnant ladies (folate!)  

In Korea, Miyeokguk, a seaweed soup, is often served to women as postpartum care.  It is strongly believed that it cleanses the blood, contracts the womb, and increases milk production though one should watch out for the high sodium content.  Also, wakame has some beneficial components like lignans and fucoxanthins which are linked to lower levels of breast cancer,  prevents fat accumulation, and aids in burning fatty tissue.

You can find this cucumber wakame sunomono served as a starter or side dish in many Japanese restaurants.  Su is vinegar in Japanese and sunonmono is usually referenced to vinegared dishes.  Now you can enjoy this simple recipe at home.

Cucumber Wakame Sunomono
 

INGREDIENTS//Serves 2

• 1/2 English cucumber or Kyuri (Japanese cucumber)
•  10 grams wakame, dehydrated
• 1 1/2 tablespoons rice vinegar
• 1/2 teaspoon sugar
• ginger, grated or finely sliced matchsticks (garnish, optional)

PREPARATION

To rehydrate your wakame, soak your wakame in a cup of room temperature water for about 10 minutes.  Drain and squeeze out any excess water.

Cut your cucumber in half lengthwise.  Deseed it.  Use your mandoline to thinly slice the cucumbers.  Add salt and let sit for 15-30 minutes.  Drain the water, rinse, and then give the cucumbers a squeeze to get rid of any excess water.
 

INSTRUCTIONS

In a small bowl, combine cucumbers and the rehydrated wakame. 

Combine your rice vinegar and sugar in a small separate bowl.  Stir until the sugar dissolves.

Pour the vinegar mix in with the cucumber and wakame, add salt accordingly.   Toss and let it sit for 10 minutes before serving.  Garnish with sesame seeds or ginger.


Matcha Cookies with White Chocolate Chunks

I participated in a Japanese tea ceremony in Kyoto once.  I fell in love with the ritual, the serenity, the aesthetics, and all the equipment involved but I never mastered the way of tea.  I do enjoy my green teas (teabags please) at home and I sometimes whisk up some matcha (special treat to myself) when I have a moment to just sit and do nothing but sip my matcha. 

I sit and reflect as the weight of the matcha (I prepare it thick) sits on my tongue and glides down my throat.  I savor the bitterness that coats my palate and then fades away as I continue to take another sip.  This is my way of tea.

Matcha can easily be incorporated in smoothies, baked goods, ice cream, and lattes.   If you find yourself with some at home,  here's a recipe for you to try.


Matcha Cookies with White Chocolate Chunks
 

INGREDIENTS//Yields 35 cookies

• 300 grams (2 cups) flour
• 125 grams butter (room temperature)
• 1/2 cup packed brown sugar
• 1/4 cup granulated sugar
•  2 eggs
• 1 tablespoon matcha powder
• 1/2 teaspoon baking soda
• 1/2 teaspoon salt
• 100 grams white chocolate chips

INSTRUCTIONS

In a medium size mixing bowl, add your butter and sugars.  Mix together until it starts to get creamy.

Add your eggs and continue to mix.

In a separate medium size mixing bowl, sift your dry ingredients together: flour, matcha powder, baking soda, and salt.  Combine well.

Then add this dry mixture in with the wet ingredients and mix together.

After everything is well combined, add your white chocolate chunks.  Use a spatula to fold them in.

Chill this cookie dough in the fridge for an hour or more.

Prepare your baking sheet. 

Scoop out a tablespoon full of dough and roll it into a ball and place it on a baking sheet two inches apart from one another.

Once your oven is pre-heated to 175°C or 350°F, place your baking tray in the oven for 8-12 minutes.

Every oven varies, I put mine in for 10 minutes. 

Take out your cookies and let it cool.

NOTE
These cookies come out soft and moist.


Dates, Nut, and Seed Toast

Sweet Seed Date Toast

This bread is chock full of seeds and nuts and is naturally sweetened with dates. 

Sweet Seed Date Toast

I love stumbling on new ideas and in this recipe it was using dried dates as a sweetener.  I've used date syrup in the past but I never thought of making it myself.   Then I came across this raw, homemade date syrup recipe in The Kitchn.

Toast served with St. Môret cheese spread, a slice of cucumber, smoked salmon, chives, and white onions.

Toast served with St. Môret cheese spread, a slice of cucumber, smoked salmon, chives, and white onions.

I was unsuccessfully trying to make granola bars using my own adaptations from Deliciously Ella's Date and Oat bars recipe...

Sweet Seed Date Toast

but I successfully turned it into toast bits that go great with dips and spreads.  They are packed full of nutritious seeds.  Add a nut butter spread to it and you've got a great "start the day off right"  kind of breakfast or a "pick me up energy snack" for the afternoon.


Dates, Nut, and Seed Toast

INGREDIENTS//Yields 36 squared pieces

• 2 cups (220 grams) buckwheat flakes (unroasted)
• 1/2 cup (70 grams) sunflower seed
• 3 tablespoons chia seed
• 1/2 cup (90 grams) flax seed
• 100 grams Brazil nuts, finely chopped     
• 12-15 dates, pitted (use 15 for a touch more of sweetness)
• 1/2 cup (100 ml) coconut oil
•  1 1/4 (300ml) cup water
• 1/2 cup amaranth (30-40 grams), popped (optional-I had some on reserve)  Use 3 tablespoons raw amaranth to get 1/2 cup popped amaranth.

PREPARATION

Let the chia seeds sit in 12 tablespoons of water for about 15 minutes.  It will become gelatinous.
Pop your amaranth seeds if you don't have some on reserve.

INSTRUCTIONS

Combine the buckwheat flakes, sunflower seeds, flax seed and Brazil nuts in a large mixing bowl.

Put your dates and coconut oil in a blender and mix with 1 1/4 cup water.  Blend until you get a nice smooth consistency.

Add this to the ingredients in the large mixing bowl and stir to combine everything.

Once the chia seeds have set into a gelatinous state, add this to the mixing bowl and stir.

Line a baking tray (33x20 cm or 13 x 9 inch tray) with parchment paper making sure that you use more than enough parchment paper so that it pulls up on the sides.

Fill your tray with the seed date toast mix.

Sprinkle the popped amaranth seed all over the mix and using the back of a spatula, spread it across evenly press down to flatten and smooth out the mix.

Bake at 150°C for 30-40 minutes or until the top turns golden brown.

Let cool and set for at least a half an hour.  Then cut up into square shape bite size toasts.  They will be around 2 centimeters thick, then slice through the middle to divide into two to get about 1 centimeter slices of bite size toast.

Place it back in the oven open face up and toast until the top turns golden. 

Let it cool.  These can be stored in a seal tight container for up to a week.


NOTE

I divided the length into six parts and the width into three parts which yields 18 pieces.  Then I divided the 18 pieces by slicing through the middle which yields 36 pieces of toast.  You can store these in a seal tight container for up to a week.


Homemade Fruit Popsicles

Fruit flavors, coconut milk, and agave syrup.

Fruit flavors, coconut milk, and agave syrup.

Early Sunday morning as I stepped out the door on my way to the market, I was greeted by brisk weather.  We had a heat wave just up until then so the contrast was startling.   A surge of anxiety immediately entered my head—Where did I store the children's down jackets?  Time to pack up the summer clothes (gosh, didn't i just take them out a month ago?)  And the comforters?...

Piña colada flavor.

Piña colada flavor.

At the market, my hoarding tendencies shone through and I quickly filled my bag up with as much summer fresh fruit as possible. We never know when that dark, grey nimbostratus cloud may appear and disappear.  If we are lucky, by next spring we will see sunshine again.  That was me heading into panic mode.

We love berries & coconut and mango coconut flavor.

We love berries & coconut and mango coconut flavor.

That all went away rather quickly.  The sun proved stronger and stuck around.  I came home with a load of fresh fruits, spent the following days making different flavor fruit popsicles, and eating them on our balcony in the sweltering heat with the kids.

We clung onto our last summer days together, sucking down our popsicles before heading back to school today.  After the long summer hols, people are back at work, and children are back to school.  Paris has resumed its daily rhythm.  In France, they call it la rentrée.  Wishing everyone a bonne rentrée!
 

Homemade Fruit Popsicles

INGREDIENTS//Yields 8 popsicles (2 ounce molds)

• Fresh fruit
• 1 cup coconut milk  
• 3 tablespoons agave syrup or maple syrup
• 1 lemon


INSTRUCTIONS

You will probably have to adjust the quantity of fruit and coconut milk to fill your popsicle mold. 

We chose to make different fruit flavors for each popsicle holder so we blended each concoction individually and then filled the mold.

Prepare your coconut milk by adding 3 tablespoons of agave syrup to it.  Stir to combine.

Choose a couple of pieces of fresh fruit (don't be afraid to mix and match!), add two tablespoons of coconut milk, and squeeze a couple of drops of lemon juice.  Blend it, fill your mold, and then freeze it.


Kefir and Berries

Kefir with Chia Seeds, Oats, and Raspberries

Kefir with Chia Seeds, Oats, and Raspberries

Last week I posted about making milk kefir at home.  I make about a cup a day to keep my kefir grains active, healthy and multiplying.  It usually rotates among the four of us in our family.   Some days it will be someone's breakfast, on other days it will be someone else's afternoon snack or dessert. 

Milk Kefir is consumed as a drink but I usually let it fement until I get a thicker consistency, that's the way I like it.  It works well as a smoothie base or with a muesli base.   Add any fruit, nuts, and seeds and have yourself a healthy treat to start your day or for any time of the day.

Kefir with Chia Seeds, Sunflower Seeds, Goji Berries, and Blueberries

Kefir with Chia Seeds, Sunflower Seeds, Goji Berries, and Blueberries

How to Make Milk Kefir

I recently adopted some kefir grains about two months ago.  It traveled all the way from Bangkok to meet me in Paris.   My friend Silvia lives in Bangkok and comes to Paris for her annual holidays.  She has a generous heart, is waste conscious, and she's the one who bestowed me these clumpy, glutinous kefir grain jewels.  If you are lucky, you'll find someone to share some grains with you too. 

Being a newbie to any cultural or fermentation process, I admit I was a bit dubious in the beginning about caring for these grains.  I grew up with the notion that milk should be refigerated at all times otherwise one would get deathly ill from drinking spoiled milk.   Calling out for my stomach of steel and rolling up my sleeves, I embraced this thoughtful gift that traveled distances just to be with me knowing its full health benefits but wary of the road never taken.

Kefir grains contain a yeast and bacteria starter that ferments the milk.  Having several different strains of yeast and bacteria in it makes it a powerful probiotic source, as well as being high in calcium, protein, vitamins and other minerals. 

The simplest way I care for my kefir grains is to use them everyday to produce kefir milk.  I produce a cup of kefir milk per day with my grains.  As long as they stay healthy, they are re-usable.  You should achieve a consistency of a drinking yogurt.  Milk kefir may taste more sour than yogurt which is normal.  You can alter the consistency and the taste of the milk kefir by playing with the fermentation time.
 

MILK KEFIR

INGREDIENTS//Yields 1 cup

• 1 cup whole organic milk (cow, goat, or sheep's milk—just stick to the same one)
• 1 tablespoon active kefir grain


INSTRUCTIONS

In a clean glass jar place your active kefir grains and pour in a cup of milk (straight from the fridge.

Cover the jar with a tea towel, cheesecloth, or paper towel.

Place the jar in an area avoiding direct sunlightwith room temperature around 21°C-30°C (70-85°F).

Let it sit for 24 hours.  Check after 12 hours to see if the consistency of the milk has thickened or clumped.  If so, give it a taste to see if it has a tartness to it.  Then, it's ready for use. 

Milk ferments faster in warmer temperatures and slower in cooler temperatures.  Usually it takes 24 hours for it to be ready in an ideal room temperature environment. 

Once it's fermented according to your taste buds,  pass the milk kefir and its grains through a plastic strainer into the container for the milk kefir.

Scoop out the grains and begin the process again by adding fresh milk into another clean glass jar.


NOTE

When Silvia arrived in Paris at the end of June, it was still 18°C while Bangkok was near 40°C.  It took us days for our first batch of milk kefir to form.  Once it started warming up in Paris, I was able to get a batch of kefir milk in 24 hours.  Remember that these are active grains, you want to keep them nourished so constantly feeding them with fresh milk (not ultra-pasteurized milk) will keep them healthy and growing.  You want to keep the clumps small so that they have more surface area to be exposed to the milk which in turn feeds them and nourishes them so that they can mulitply.

Also, best to use a plastic strainer as metal can damage the grain.

You can also make non-dairy kefir.

Amaranth

Popped and Unpopped Amaranth Seeds

Popped and Unpopped Amaranth Seeds

Did you know that amaranth is actually a seed of a plant and that you can eat the leaves too?  I went to pick up a basket of organic veggies the other day and there was an unrecognizeable stalk with some leaves dangling off of it.  The lady told me it was amaranth.

I'm familiar with the seeds but I never saw an unrooted amaranth stalk.  After some research,  it turns out that I grew up eating amaranth leaves without ever realizing it.  It is a staple food to the Aztecs and it's used in Asian cuisine too.  In Chinese it is called xiàncài,莧菜.   Apparently there are many species and it comes in a large range in colors from light to dark green shades, and violet to red leaf hues.

My mother would sauté the amaranth (xiàncài,莧菜) and include that in the many dishes served in front of us.    Similar to spinach, it offers the same nutritional qualities full of antioxidants, protein, vitamins, calcium, iron and minerals.  FYI, I used those few dangling leaves in my japchae dish.


Categorized as a whole-grain food, it is actually a seed.  Just like quinoa, it has a higher plant protein and calcium content compared to its other grain competitors.  It's gluten-free too.

You can cook this as the grain portion of your meal, have it for breakfast as porridge, pop it and use it as toppings for yogurt, salad, dessert, and other dishes.

Popped Amaranth
 

INGREDIENTS// Yields 1/2 cup

• 3 tablespoons amaranth seed, uncooked


INSTUCTIONS

Heat a pan over medium to high heat.

Add a drop of water to it.  If it sizzles and evaporates immediately, your pan is good to go.

Add one tablespoon of amaranth at a time.  It should begin to pop immediately.  If not, then your pan is not hot enough.  Then entire popping process should take less than 10 seconds.  Not all of it will pop so remove it from the heat before it burns and transfer it to a bowl.

Let it cool completely before you store it in a sealed jar or container.

NOTE

It took me a couple of tries until I got this right.  You will know when you get it right.  It will take a matter of seconds before the amaranth begins to pop so if it is taking longer it means your pan is not hot enough.  Also, I don't use a cover for the pan so it gets slightly messy, but a hoover will take care of that quickly.


Market Fresh Cod Ceviche

Fresh Market Cod Ceviche

Market Fresh Cod Ceviche

INGREDIENTS//Serves 4

• 350-400 grams cod fish —high quality, fresh, de-boned, filleted, skinned, and pin bones free
• 1 small-medium red pepper, deseeded and diced
• 1 small fennel with its fronds, sliced thinly, fronds picked
• 1 spring onion, sliced finely
• A few sprigs of coriander—leaves picked, stalks chopped
• 2 limes, juiced or 1 lime and 1 small orange, juiced
• 1 teaspoon sea salt
• 1 teaspoon espelette pepper purée, sriracha sauce, or tabasco
• extra virgin olive oil, optional
 

INSTRUCTIONS

Prepare your pepper, fennel, spring onions, and coriander.  Place it on the side.

Cut your filleted fish into small chunks and place it into a pyrex mixing bowl.

Add the salt, lime-orange juice, and the chili pepper to the fish and toss it around.

Place it in the refigerator for 15-30 minutes making sure to toss it around every so often.

When the sides are marinated, the color will turn opaque.  Take it out of the refigerator.

Add the pepper, fennel, and spring onion to the marinated fish and toss together.

If needed, add some more salt accordingly.

Then add the coriander leaves, a bit of the chopped sprigs and toss it together.

Garnish with the fennel fronds.

Divvy it up, drizzle a touch of olive oil and serve immediately!


NOTE
Spring onions or scallions as we call them in the U.S. are known as oignon nouveau, oignon frais, or cébettes in France.  The ones in France seem to have a larger bulb so I can easily slice them along a mandoline. 

Blueberry Pocky

What a find!  Pocky is a childhood treat from Japan.  The original flavor came in milk chocolate and that's what I grew up with.  Ezaki Glico produced the first Pocky sticks in Japan back in 1966 and they are popular in other Asian countires.

In the U.S., they are easily found throughout the Asian grocery stores.  I just found out that Pocky is sold under the name of Mikado in France since 1982.  I had no idea, and here I am in Paris running to the Asian grocery store on rue St. Anne paying twice as much for it when I could have just picked up a box from the local supermarket around the corner.  The only thing is that they are limited in flavors.  I have only seen Mikado in milk chocolate, dark chocolate, and chocolate with almond coating.

Pocky has since evolved from just offering milk chocolate, milk chocolate with almond coating, strawberry, and dark chocolate as flavors.  Now it offers chocolate banana, cookies and cream, matcha, sweet milk, melon (cantoloupe), mango, etc...just to name a few.  Blueberry is my most recent find.  What a great treat and fun snack!


Onigiri, Japanese rice balls packed full of wholesomeness.

There was one year during my elementary school years where I brought a bento box lunch as opposed to a brown bag lunch.  I say one year because I went to about 4 or 5 different elementary schools and for some particular reason I really remember lunch time at only one particular elementary school. 

This was the year my uncle, Iichigawa-san from Japan, came to stay with us.  He would make me rice balls stuffed with umeboshi, a Japanese pickled salt plum (my favorite) or fill them with pieces of salmon or ikura (salmon roe) for my bento lunch.  Sometimes they were round like a ball and sometimes they were shaped into triangles. Sometimes they were wrapped with nori (seaweed) and other times just sprinkled with furikake, mixed savory sprinkles.

This is when I had my Molly Ringwald moment from The Breakfast Club  "sushi lunch scene"—so if you can imagine what the kids' reactions were towards sushi in the 80's...I clearly wasn't the most envied one while chomping down into my black seaweed covered rice balls.

Seaweed is a health food and sushi has gone global.  I now make this with flavored rice, experimenting with different grains, beans, and seeds and adding shredded vegetables into the mix.   It's practical for picnics and makes a great snack.  Create your own onigiri according to your own tastebuds!

Onigiri (Japanese Rice Balls)

INGREDIENTS//Yields 4

• 2 cups Japanese short grain rice
• 1/2 cup roasted buckwheat groats (kasha)
• 1/2 cup adzuki bean flakes
•  1 small avocado
• 2 sheets of Korean style roasted seaweed
•  yukari (dried shiso leaf powder)
•  sesame seeds
• 1 tablespoon amaranth seed, popped


INSTRUCTIONS

In your removable rice cooker pot add the rice and rinse with water using your hands to swish the rice and water around.  The water will be cloudy.  RInse until it gets less cloudy.

Add the buckwheat and adzuki beans, and fill the pot with water to the point where indicated for 3 cups of water—I usually add 1/4-1/2 cup water more.

Place it back in your rice cooker and select the mode for cooking rice.

When cooked, using your rice spatula genlty flip through the rice to fluff it up a bit.

Let the rice cool down before handling.

If using a onigiri triangle mold, wet it beforehand so that the rice does not stick to it (remember to do it before each one).

Simply fill the mold with rice just below the halfway point and create a dent in the middle.

Scoop out a quarter of the avocado and place it in the middle.  Be careful not to overstuff.

Fill the top half with the rice mixture press down with the lid onto the rice.

Take the lid off, flip over the mold, and press down on the flexible backside to push out the rice.

You can also use your hands to mold the rice into balls or triangles: Keep your hands wet, spread the rice out on the palms of your hands, place the fillings in the center, fold up the rice around it, pack it tightly with your hands, and form it into the shape you like. 

Sprinkle it with some sesame seeds and/or yukari (adds a tangy and slightly salty taste), and popped amaranth seeds.

Cut your Korean roasted seaweed in half lengthwise, place the rice triangle in the middle and fold up the sides of the seaweed pressing the seaweed into the rice so that it sticks.  Bend the top flaps of the seaweed down along the sides of the triangle so that the rice triangle is entirely wrapped.


NOTE

I use Korean or Japanese seaweed.  Korean seaweed is more flavorful because it is roasted with oil and salt.  Check the ingredients list making sure it is short and not added with additional salt, sugar or artificial ingredients.

Japchae (Korean Sweet Potato Noodles with Veggies)

Japchae1Resize.jpg

My days in Koreatown in Manhattan and in Flushing, Queens are long gone.  Paris has its share of Korean restaurants but I can't say it compares to the plethora of choices given on a one block radius of Manhattan.  And this one block radius is just a tiny representation of the many blocks of which Korea Way stretches along, 5th Ave through to Broadway on W32 streets.   Apparently, it is paving its way in the other direction too— towards Madison. 

My penchant for discovering new ingredients or different ways to cook them up stems back to my youth: influenced by my parents, who love to eat, cook and dine out;  feeding my soul and stomach through my travels; and eating my way through NYC during my college years—lots of interesting 24/7 eateries to be discovered in the wee morning for after hours clubbing.  One of those stomach refuelling pit stops was at a Korean restaurant called Kang Suh.  Ahh, those were the days...

Fortunately, I have good Korean friends who can cook.  They have educated me and shared their recipes throughout the years.  Now I can whip up the Korean basics and just re-create the past.
 

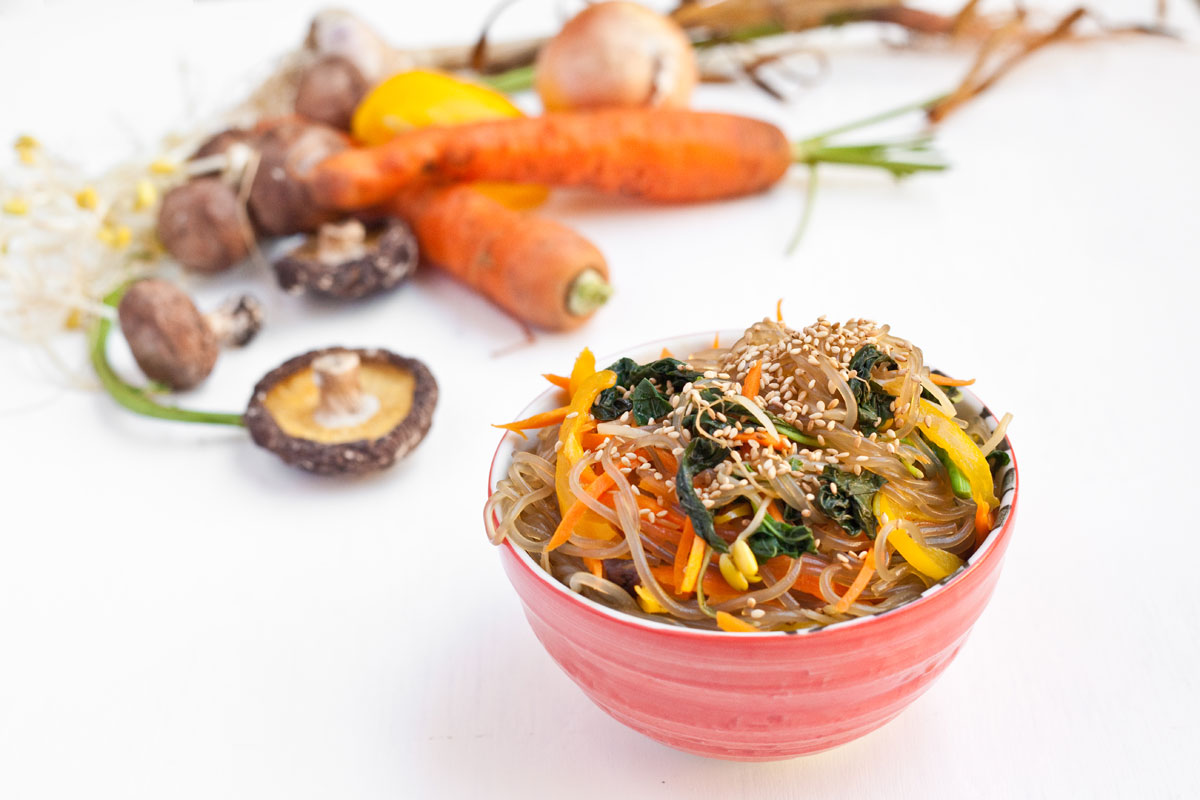
Japchae (Korean Sweet Potato Noodles with Vegetables)

INGREDIENTS//Serves 4

• 200 grams (7 ounces) dangmyeon (Korean sweet potato noodles)
• 1 small onion, sliced thinly
• 1 carrot, julienned
• 1 pepper (red, yellow, or orange), sliced thinly
• 3-4 shiitake mushrooms, dried or 100 grams small white "button" mushrooms (aka champignon de Paris in France), sliced thinly
• 100 grams of bean sprouts
• 100 grams fresh spinach
• 1-2 cloves garlic, minced
• 1 egg, whole (optional, opt-out if going the vegan route)
• 1-2 tablespoons sesame seeds

Sauce
• 4 tablespoons soy sauce or tamari (gluten-free option)
• 1 1/2 tablespoon honey or 1 tablespoon brown sugar (vegan option)
• 1 tablespoon sesame oil
• 1/2 teaspoon black pepper

PREPARTION

If using dried shiitake mushrooms, you need to soak them at least a few hours (I soak them in the morning for evening use) in advance in room temperature water.  Put them in a bowl of water and swish them around with the stem side down.  Once they are plumped up and soft, give them a squeeze and set them aside for later use.

Slice and julienne all your vegetables: the mandoline comes in handy.

For the egg topping, seperate your egg yolk and white.  Fry them up seperately in a pan and then slice it up into matchstick pieces. 

INSTRUCTIONS

Prepare your sauce and rinse all your vegetables.

Bring a large pot of water to boil and then add your dangmyeon.  Follow the instuctions on the back for the time.  It's usually around 5-7 minutes.

During this time, marinate your mushrooms in one tablespoon of the prepared sauce.

Transfer the cooked noodles to a colander and rinse under cold water, drain, and put them in a large mixing bowl.

Rinse out your pot, add water and bring it to a boil in order to blanche your spinach and your bean sprouts at the same time.  Basically you want to boil your spinach and your bean sprouts for a short amount of time (1-2 minutes), then quickly rinse it under cold water. 

In a seperate bowl, add the minced garlic and sea salt.  Squeeze out the remaining water from the spinach and the bean sprouts and rub it into the garlic and sea salt.  Let it sit.

In a single medium size pan, add some cooking oil to stir fry your vegetables seperately in this order: onion, pepper, carrot, and mushrooms. 

Transfer each ingredient after it's cooked to a bowl set aside.  The vegetables should not be cooked until limp.  It's nice when they keep their color and still have a slight crunch to them.  So keep the cook time short.

Add the prepared sauce into the mixing bowl with the noodles and stir in all your cooked ingredients. 

Garnish with lots of sesame seeds and your egg toppings (optional).


NOTE

I picked up an organic basket of veggies this week and I had a stalk of amaranth included in it.  I have only purchased the grains in the past so I didn't even know what the plant resembled.   It had some leafy greens on it, so I plucked them off and used it in place of the spinach.   It was a great substitution.

You can also add beef to this dish: slice up your beef, marinate it with prepared sauce in the same bowl with the mushrooms, and stir fry it together.

This is a dish that can be eaten cold, at room temperature, or hot.  If you want it hot, simply place all the ingredients back into the pan to heat up before serving.


It's not Bastille Day, it's le quatorze juillet, la Fête Nationale.

I just discovered that Bastille Day is a British term and that's what I always referred to it as when growing up in New York.  In New York, there were annual street fairs celebrating Bastille day with French food and wine.  Even contests were set up so that one could win a roundtrip airfare to Paris and back.  

Living in the know and now in France, we simply refer to it as le quatorze juillet and it is formally called la fête nationale.  Festivities start with the Fireman's Ball in various fire stations across Paris on the eve, then a morning military parade on the Avenue des Champs Elysées, and closes with an evening fireworks display from the Eiffel Tower. 

History in a nutshell:  Mutinous minds were brewing a few years earlier leading up to the start of the French Revolution which began with the storming of the Bastille prison on July 14, 1789.  Living in a feudal aristocratic system with the philosophes of Enlightenment, a weak monarchy, and with escalating food and taxe prices—let's just say that some people were not happy.  

The Bastille prison symbolized the arbritrary use of power of the French monarchy.  It's where upper-class and political prisoners of French society were held, unopen to trial, and only under the king's orders.  Thus, attacking it signified the start of a revolution which led towards years of violence and bloodshed—although not so much on that particular day.

Excactly one year after the storming of the Bastille, the Fête de la Fédération was inaugurated on July 14, 1790 to celebrate the unity of France, symbolizing peace.  July 14th commemorates the storming of the Bastille and the Fête de la Fédération.

Here's a taste of symbolism for you pictured below...

Grilled Magret de Canard

Grilled Magret de Canard

And if you keep scrolling down to the bottom, I leave you with Serge's scandalous version of La Marseillaise, the French national anthem. 

Vive la France!  Vice la République!

 Grilled Magret de Canard

INGREDIENTS//Serves 2-3

• 1 farm-raised magret de canard (this particular piece weighed 394 grams, vacuum-packed)
 

INSTRUCTIONS

Pre-heat your oven to 220° C. 

Lay your naked duck breast with skin facing up.  Score the skin of the duck in squares without cutting into the flesh. 

Pop the duck into the over with the skin fat face up for 15 minutes. 

After 15 minutes, flip the duck over and then lower the temperature to 180°C and let it cook for 10 minutes. Take it out of the over and and cut into slices. 

Serve it along with some roasted potatoes and garlicky green beans.

NOTE

I'm a pesco-vegetarian with lots of taste testers amongst me.  Apparently this gets a thumbs up with my carnivorous family.  You can't screw this recipe up, just throw it in the oven!
 

What is kaeshi?

Kaeshi

Kaeshi

This recipe goes hand in hand with my previous posts regarding the dashi stock recipes.  Kaeshi is the essence of Japanese flavoring base to noodles soups and dipping sauce and can easily be used in many other dishes.  My kids eat an entire broccoli head when I cook it in boiling water with a touch of kaeshi.  This can be found in my fridge during the summer months mainly for my cold summer noodle dishes. 

Mix one part kaeshi and dilute it with one part dashi (or more according to your taste) and you'll have yourself a homemade tsuyu sauce without MSG and with a vegetarian option (using the vegetarian dashi recipe). 

Kaeshi (Japanese Noodle Sauce Base)
 

INGREDIENTS//Yields 500 ml

•  2 cups soy sauce or tamari
•  1/2 cup honmirin
•  1/2 cup sugar
 

INSTRUCTIONS

Add the honmirin to the sauce pan and bring it to a boil.  Then turn down the heat to a low simmer to evaporate the alcohol.

Add the sugar and stir it around until melted.

Then add the soy sauce and bring up the heat (do not reach boiling point), stirring from time to time.

Once you see it begin to bubble, turn off the heat and let it cool.

Transfer it into a glass container and store it in the refigerator.

You can make a large batch of this sauce and store it in an airtight container for up to 3 months.


NOTE

Honmirin ("real mirin") is one of three types of mirin that you can easily find in the Japanese stores.  It is a rice wine much like sake and is used for cooking.  It contains the highest amount of alcohol of the three types.  You can use the other mirins to make kaeshi as well.


Katsuobushi Dashi

Ingredients for katsuobushi dashi stock.

Ingredients for katsuobushi dashi stock.

This is a follow up on my vegetarian dashi recipe as most of the time dashi stock in Japanese cuisine is a blend of katsuobushi and kombu.  As mentioned in my previous post, you can have a variation between dried kelp (kombu), dried bonito flakes (katsuobushi), dried shiitake mushrooms and small dried fish for dashi. 

Katsuobushi is a Japanese dried, fermented, smoked skipjack tuna.  Back in the day, a block of katsuoboshi would be kept at hand and when needed; they would simply shave off what was needed on a wood plane.  If you are a die-hard traditionalist you can still purchase blocks of this tuna and make shavings for yourself at home.  Not only is it used for stock, it can be added to enhance flavors as a seasoning, topping, and stuffing.  It also has an aesthetic effect when placed on hot foods; the thin shavings start to move and and shrivel down.

Katsuobushi Dashi Stock

Katsuobushi Dashi Stock

Katsuobushi is easily found in the Japanese and health food stores and its flakes are usually sold packaged in a transparent sealed bag.  It's also rich in umami flavors especially when combined with kombu in this stock.

Katsuobushi Dashi

INGREDIENTS//Yields approx. 1 liter

•  1 liter water
•  1 piece kombu (about 12- inches long)
• 10-15 grams katsuobushi

PREPARATION
In a bowl, steep your kombu in a litre of water overnight or at least 15-30 minutes beforehand.

INSTRUCTIONS

Fill a large pot with the llitre of water and the steeped kombu.

Bring it to a simmer and just before it comes to a boil, fish out the kombu.
 
At boiling point, quickly add the katsuobushi and turn off the heat.

Let it sit for 10 minutes or until the katsuobushi sinks to the bottom.

Strain the stock for use right away or let it cool and pour it in a container, seal tightly, and then refigerate for another time (holds up to 3-4 days).


NOTE

Such as the Kombu dashi stock recipe, the ingredients can be re-used right away to make a second stock referred to as niban dashi.  The first stock is usually stronger in flavor and is referred to as ichiban dashi.