Pumpkin Lentil Soup

PumpkinLentilSoupR.jpg

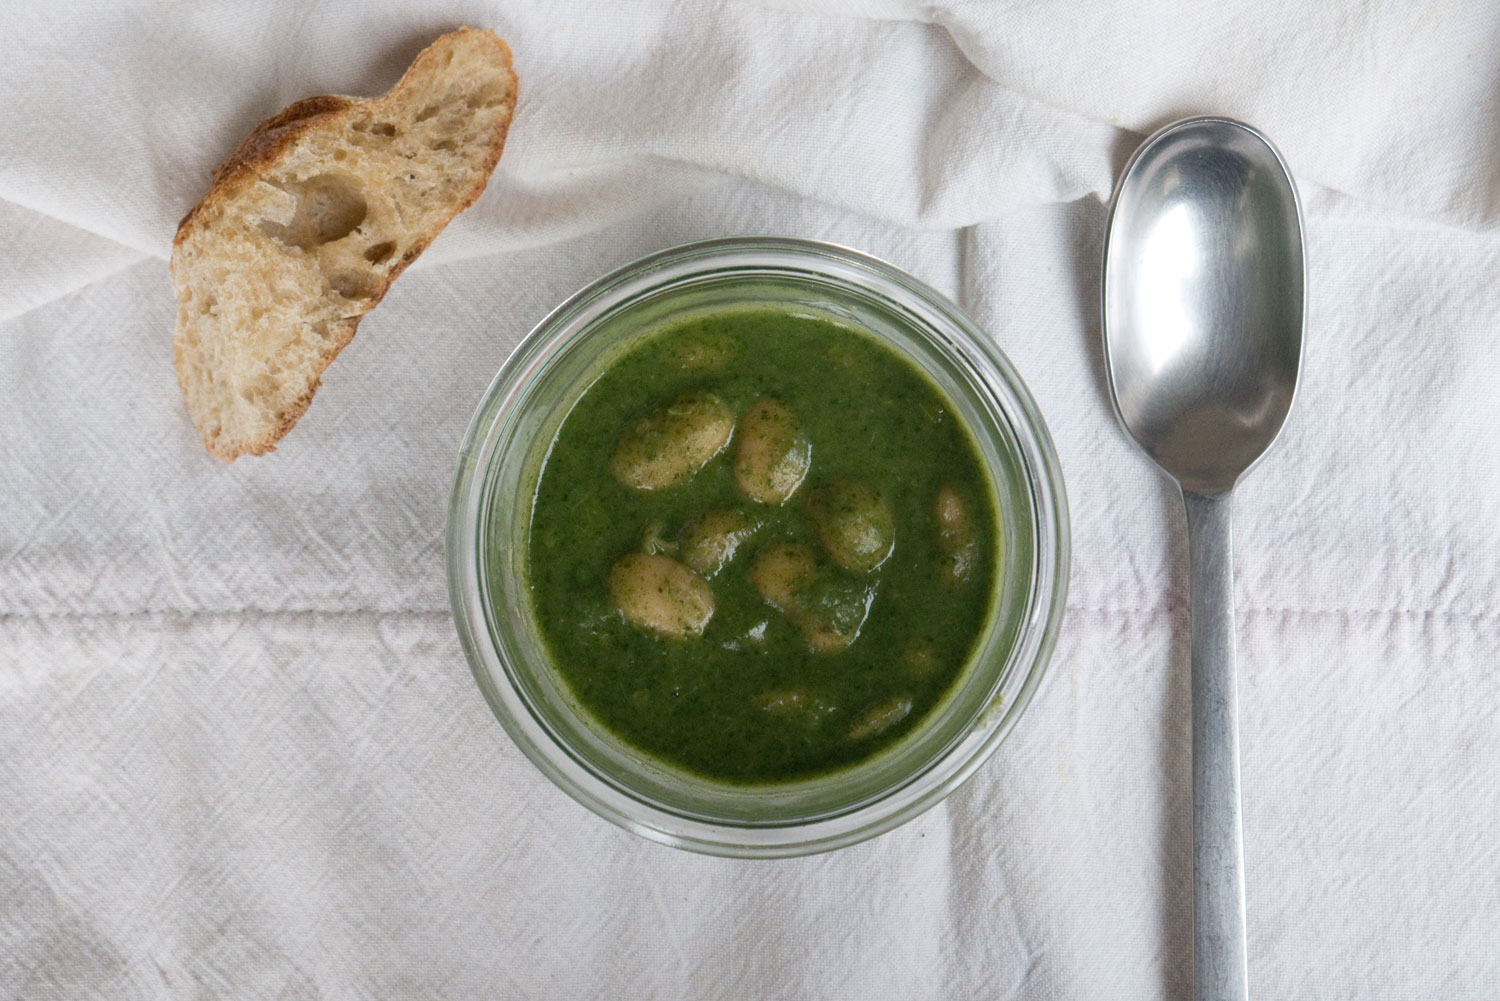
This is a very hearty soup.  It's a good time for it in Paris since the weather in Autumn goes from grey, cold days to vibrant sunny days where we still need a scarf wrapped around our necks—and it's not just a fashion statement.

The lentils beef up this soup and it makes it a nice replacement to potatoes,  and you'll get some added protein in.      As we are surrounded by an abundance of boulangeries in this city, nothing beats a straight out of the oven baguette.   Tear off a piece, lather it with some slightly salted butter, and drench it in this soup.  Just be sure to have enough leftover to mop up the bottom of your bowl.

PumpkinLentilSoupRCarre2.jpg

Pumpkin Lentil Soup

INGREDIENTS//Serves 6

• 1 medium size yellow onion
• 1 litre vegetable broth
• 1 small pumpkin (around 800 grams), cut into small chunks
• 124 grams (1 cup) lentils
• 1 carrot, chopped into chunks
• 1 bay leaf
• 1 teaspoon of curcuma (tumeric)
• 1/2 teaspoon dried chili (I used Esplette and I always have Korean red pepper powder on hand)
• salt, adjust accordingly to taste


INSTRUCTIONS

In a large Dutch oven on medium heat add a tablespoon of olive oil and cook your onions until translucent and soft.

Increase the heat.  Add your vegetable broth, the pumpkin, the lentils, the bay leaf, and the carrot and bring it to boiling point.  Then turn down to low-medium heat and cover.

Let it simmer for about 30 minutes or until the pumpkin and lentils are cooked (they will have softened up, and if your pumpkin is slighty harder than the lentils, it's fine.  It will be blended together).  Stir in your tumeric and chili powder.

Let it cool down enough so that you can pour it in a blender and whiz it all up. 

To reheat your soup, pour it back into the Dutch oven and heat at low heat.


Red Kale Aubergine Zucchini Salad

RedKaleSaladR.jpg

Oh Kale, you are nutritiously dense,

you are a super food.

Our bodies keep healthy after devouring you

finding ourselves in a good mood.

It only makes sense

you are immense in variety and vitamins.

Loaded with antioxidants and a good source of Vitamin K,

a natural coagulant— blood clotting's great way.

The story is

you are an anti-inflammatory,

fighting against arthritis and autoimmune diseases. 

Detox with you,

and we'll be walking like peacocks spreading its plumes.

 You are in bloom,

It's your day and we will have it your way.

Happy National Kale Day.


Red Kale Aubergine Zucchini Salad

INGREDIENTS//Serves 3 (as a main plate)

• 1 bunch Redbor kale, shredded
• 1 eggplant, sliced and grilled
• 2 zucchinis, sliced and grilled
• 1 red pepper, diced
• 120 grams feta cheese, crumbled

dressing

• 3 tablespoons tahini
• 100 ml water
• 1 clove garlic, minced
• 1 lemon, juiced
• 1 tablespoon sesame oil
• 1 teaspoon tamarind paste
• Salt, adjust accordingly

INSTRUCTIONS

Prepare the dressing first.  Combine all the ingredients and mix well.

In a large mixing bowl combine the kale and the dressing.   The kale is tough so you'll want to massage the dressing into the kale.  Let it marinate for an hour if possible so that it softens up.

I use a grill pan to grill my vegetables.    For the eggplant, salt them first and put them in a colander for it to drain for 30 minutes.  Then rinse it off with water and pat it dry with a tea towel.

Brush olive oil on both sides of your eggplant.

Turn on the heat to medium-high.  Place the eggplant on the grill and cook until brown and until the flesh has softened up.

To grill the zucchinis, just brush both sides with olive oil and place it on the grill pan for 3-4 minutes on each side.

In a large serving bowl, combine your dressed kale, pepper, and feta cheese.  Then lay the grilled vegetables over the salad and serve.

Tiramisu aux Mirabelles

Beautiful destoned mirabelles.

Beautiful destoned mirabelles.

Cook down until nice and soft, almost mushy but still intact.

Cook down until nice and soft, almost mushy but still intact.

I love visiting kitchens that aren't mine and most of all I love it when people cook things up for me.   This week I had the pleasure of visitng Corinne's new home and we christened her kitchen with a tiramisu aux mirabelles.

Corinne whipping up the filling.

Corinne whipping up the filling.

Cream filling.

Cream filling.

I told you in my last post that I couldn't get enough of mirabelles.  I also couldn't forget the tiramisu aux fraises that Corinne once made for me.   Mirabelle season is in full swing and they are sold everywhere at the moment.  So when Corinne offered to make tiramisu aux mirabelles I thought aloud, "ooh, how could I refuse a beautiful invitation—double ooh—I never even thought of a recipe like this!"

Cooking with style.

Cooking with style.

Madeleines soaked in mirabelle liqueur.

Madeleines soaked in mirabelle liqueur.

For her recipe she used liqueur de mirabelle which she made herself.  I missed out on the "making of " this liqueur so I simply replaced it with Grand Marnier which I found much subtler than the liqueur de mirabelle.  I'm not a huge liqueur fan when it comes to mixing it with sweets but that's just personal taste.

The first layer.

The first layer.

Keep layering.

Keep layering.

Corinne, being her gracious, gorgeous, red-headed self was not satisfied with the overall presentation of the dessert.   It did not give off the tantalizingly delicious effect she expected but au contraire, I can tell you it certainly was delish. 

Time to chill.

Time to chill.

Hours later enjoying the fruit of her success.

Hours later enjoying the fruit of her success.

Her tip: try using non-transparent individual jars or glasses to fill your tiramisu and add some edible colorful flower or herb to give it that "pop!" to the eye for those special guests you want to impress.

Tarte aux Mirabelles

INGREDIENTS//Serves 6

• 400 grams mirabelle, destoned
• 30 grams butter
• 1 tablespoon sugar
• 1 tablespoon Grand Marnier liquor (optional)
• 3 egg yolks
• 1 tablespoon sugar
• 2 sachets vanilla sugar
• 375 grams mascarpone
• 20 cl heavy whipping cream (keep it in the refigerator until you use it)
• 6 madeleines
 

INSTRUCTIONS

Melt the butter in a medium size pan over low heat.  Add the mirabelles and cook it over low heat for three minutes and then add the sugar.

Keep cooking the mirabelles until they soften up and caramelize.  Add the Grand Marnier.

When the mirabelles are nice and mushy (similar to the texture of an over riped fruit) turn off the heat and let it cool.

Pass it through a sieve to collect the liquid.  Set it aside.

To prepare the cream filling first whip your cream. 

In a small mixing bowl add the heavy cream (it should be cold, right out of the fridge).  Use a hand mixer and begin to whip increasing the speed until medium.  Continue whipping until the cream stiffens.  It should take about eight to ten minutes.  Set it aside.

In another medium size mixing bowl combine the egg yolks and the vanilla sugar.  Then add the mascarpone and mix well. 

Add in half the liquid you strained from the cooked down mirabelles and slowly add in the whipped cream mixing by hand.  Combine well.

Save the other half of the liquid to coat your madeleines.  Set it aside.

You can use individual dessert jars or a small pan for your tiramisu.

Begin with a layer of madeleine, a layer of the cream, a layer of the mirabelles, and finish with a layer of cream.

Cover it up and place it in the refigerator to chill for at least 3 hours.  Take it out when ready to serve.


'Tis the Season for Tarte aux Mirabelles

TarteauxMirabelles1R.jpg
TarteauxMirabelles2R.jpg

At the farmer's market you'll find an abundance of these lttle darlings, mirabelles.  It's the season and they are everywhere.    Apparently the etymology of mirabelle means "wondrous beauty".  

These cherry tomato size plums are flavorful, delicate, and sweet.    They hail from Lorraine, the north-eastern region of France and they are nowhere to be found in the U.S.A. because they have a protected origin designation that makes it impossible to import them.    So, they are banned from the U.S. which is why I was deprived of these wondrous beauties in my youthful years.

These plums don't have a high liquid content so they are perfect for dessert pies and jams.  This is an easy, "impress your Amercian friends and guests"  kind of dessert.

TarteauxMirabelles3R.jpg
TarteauxMirabelles4R.jpg

Tarte aux Mirabelles

INGREDIENTS//Serves 6

Pâte Brisée (pastry crust)
• 220 grams of flour
• 110 grams of unsalted butter, cut up and just out of the fridge
• 1 teaspoon cinnamon powder
• 1/2 teaspoon salt
• 50 ml water

Fruit Filling
• 500 grams of ripe mirabelles, halved and destoned
• 1/2 sachet of vanilla sugar (optional)
 

INSTRUCTIONS

To prepare the pastry crust use a medium size mixing bowl and sieve the flour and cinnamon powder into it. 

Then knead in the pieces of butter so that you have pieces that resemble coarse breadcrumbs.

Add some water into the mixture and keep on kneading gently until you can roll the dough into a ball.

On a flat surface add some flour and roll out the ball of dough with a rolling pin to fit a 23 cm (9 inch) tart mold. 

Pat the the pastry into the round mold carefully pressing in the sides.  Cut away any excess dough and use it fill gaps in round.

Wrap the dough lined mold in plastic wrap and place it in the fridge to chill for an hour.

Prick the dough all over with the tips of the fork.

Remove the pastry from the fridge and line the dough with some baking sheet paper and baking beans or use rice to weigh down the pastry dough.

Preheat the over to 160°C (320° F) and place the pastry in the oven and pre-bake for 10 minutes.  Remove the baking beans and baking sheet paper and you should have a biscuit like texture.

Once your pastry is pre-baked, starting from the outside of the mold arrange the mirabelles face up and back to back working inwards.

Sprinkle vanilla sugar over it and pop it back in the oven for another 30 minutes at 200° C (390° F).

The mirabelles will have softened and caramelized, and will have a glistening shine.

Cut into equal parts and serve warm or cold.

Spaghetti Squash with a Splash of Red Curry Shrimp

SpaghettiSquashRedCurry1R.jpg

Oh là là...la rentrée est là!  It's back to school here for us Parisians.  After an 8 week summer break we are happy to be eating our local veggies again.  This week I came home with a spaghetti squash in my bag.  Its been a long while since I've had one of these.  I can actually say the last time I had it was when I was living in New York— ahem, that would be more than ten years ago.

Association pour le maintien d’une agriculture paysanne (AMAP), a French equivalent of a commmunity supported agriculture (CSA)

Association pour le maintien d’une agriculture paysanne (AMAP), a French equivalent of a commmunity supported agriculture (CSA)

While collecting my veggies of the week I overhead many fellow food community members struggling about how to season their spaghetti squash.  It seemed like many of them were not so excited to meet the spaghetti squash again this week (note: it's my first one I've encountered since I have been a wanderlust this summer). 

Fearing a bland and soggy outcome and not wanting to follow the traditional marinara sauce route because nothing is worse than non "al dente spaghetti" and red sauce, I opted for an Asian twist—I was not in a gratin state of mind either.

It turns out the spaghetti squash on its own has a slight buttery sweetness which you can taste through the red curry piquant sauce.  The assisting pineapple adds to that sweetness.  This dish is filling enough to eat as is but for the rice eaters out there, this is a great topper.

Big cheer to starting off the school year with a rah-rah spirit!

Spaghetti Squash with a Splash of Red Curry Shrimp

INGREDIENTS//Serves 4
• 1 Spaghetti Squash (mine weighed 1400 grams), roasted
• 1 small onion, chopped
• 1 tablespoon vegetable oil
• 1.5 tablespoon red curry paste (add more if you like it spicy)
• 125 ml ( 1/2 cup) coconut milk
• 1 teaspoon tamarind paste
• 150 grams pineapple, canned and cut
• 1 cup edamame beans
• 300 grams (23-25 pieces) shrimp
• 1 tablespoon fish sauce
• 3-4 stems fresh coriander
• 3-4 stems fresh Thai basil or regular basil

INSTRUCTIONS

Pre-heat your oven to 200° celcius.

Cut your spaghetti squash in half lengthwise.  Using a soup spoon scrape out the seeds.  Place it flat down on a baking dish and add a quarter cup of water to the pan to help keep the surface from drying out.  Let it roast in the oven for 40 minutes.  All ovens vary so slice a knife through the skin to see if it is tender.

Take it out and let it cool.

To prepare the red curry sauce, add your oil and onions in a pan and cook it until it becomes translucent. 

Combine the red curry paste, tamarind paste and half of the coconut milk and stir until it slightly thickens. 

Add the edamame beans and shrimp and let it cook until the shrimp turns pink and then add the fish sauce, the pineapple and the rest of your coconut milk. 

Stir in some fresh basil leaves and let is simmer on low heat until ready to serve.

After the spaghetti squash has cooled down, use a fork to pull out your spaghetti shreds lengthwise for longer "noodles".

Place it in a large serving dish and top it off with the shrimp red curry sauce.

Garnish with lots of fresh coriander and serve.


NOTE

I used frozen edamame beans and I put them in directly to cook with the sauce.  It only takes about 5 minutes for it to soften up.  You can also use frozen shrimp but just be aware that there will be more liquid content. 

If you don't have any shrimp on hand, salmon and chicken are good substitutes.


Kohlrabi Salad with Beetroot and Granny Smith Apple

Oh boy, it's hot in Paris.  I call it cani-kill but most properly in French it's canicule which is a scorching heatwave.    With temperatures reaching the high 30's (celsius) and even near the 50's for the poor bakers in the bakery, one has to remember to keep hydrated.   

No air con here—  this is living in France.   Air conditioners are not commonplace in France, especially in Paris where the city codes don't allow us to blemish their beautiful historic building facades.  So I sit in my bathing suit while writing this with beads of sweat dripping down the sides of my face, forming along the back of my nape, and rolling down my back and chest.  We are on a heatwave alert, level orange.

Fortunately, Paris has plenty of municipal pools and fountains.  Remember the scene from La Dolce Vita with Anita Ekberg wading into the Trevi Fountain—well, then you can imagine how lucky we are to be able to jump into the waters of our equally beautiful fountains in Paris and recreate that scene.   They are open to the public and it's a fantastic way to keep cool.

These days it's tough to muster up any energy to do anything, much less cook.   I've got a super simple recipe for us today.   Just chop, chop away these three crispy, hydrating and refreshing ingredients and voilà, the hard part is done.  Otherwise just throw it all in a robot (food processor in French) and let it do the work!

KohlrabiSalad.jpg

So raw & crunchy...and so simply delicious.   Stay cool.

Kohlrabi Salad with Beetroot and Granny Smith Apple

INGREDIENTS//Serves 2-4
• 1 medium size kohlrabi, matchstick
• 1 small size beetroot, matchstick
• 1 granny smith apple, matchstick
• 1/2 lemon, juiced
• Salt and pepper, adjust accordingly

INSTRUCTIONS

Combine the matchstick size kohlrabi, beetroot, and Granny Smith apple in a bowl.

Squeeze some lemon, drizzle with olive oil, salt and pepper to taste.


Christoph, the Man Behind the Mayo

Separate the egg yolk from the egg white.

Separate the egg yolk from the egg white.

Drizzle a thin stream of oil while whisking continuously.

Drizzle a thin stream of oil while whisking continuously.

Whisk it up with Dijon mustard.

Whisk it up with Dijon mustard.

After 4 minutes you will have thick mayonnaise.

After 4 minutes you will have thick mayonnaise.

We just spent the long weekend in Strasbourg, the capital of Alsace.  It is not only home to several European institutions, ahem, the European Parliament, the Council of Europe just to name one or two but it is also the new home to our ex-Parisian neighbors and friends who left us behind.  So we had to pay them a visit and found ourselves in the Upper Rhine Plain sandwiched between the Vosges mountains and the Black Forest.

Remember Lady Jo?  Well, take a look at her hubby, Christoph, making mayonnaise.   What a dynamic duo!  While she reigns over the sweets, he reigns over the savory bits.   It's a four minute process and it is way better than any of that store-bought stuff.  Trust me, I am documenting this for our own good.  You won't go back to mayo in a tube (that's how it's packaged in France) once you have tried this.

Homemade Mayonnaise

Homemade Mayonnaise

"A successful mayonnaise is one with a standing spoon in it"  says the man behind the mayo.

Christoph introducing a crémant d'Alsace, domaine Zinck.

Christoph introducing a crémant d'Alsace, domaine Zinck.

ChristophMayo7R.jpg

While Christoph was making the mayo, our boys were out in the garden picking cassis or blackcurrant for our muesli breakfast in the morning.  By the way,  here's a post on my milk kefir,  those very same grains have spread and traveled to Alsace tooWhat did you think we were having our muesli with...kefir and cassis of course!  Leave it to Lady Jo to keep us nice and healthy before attacking the Black Forest—and I don't mean the cake, I mean the hike.

Cassis

Cassis

Cassis is a small deep purple berry and —boy, it's tart with a mild sweetness and jam-packed full of vitamins and antioxidants. 

This Alsatian cake landed on our breakfast table too...

Kugelhopf, Alsatian cake.

Kugelhopf, Alsatian cake.

Needless to say, we had a fantastic time with the dynamic duo and now I have another memory jotted down.  Sharing great moments with friends and recipes of course brings me joy.    We can thank Christoph for this one!

Christoph's Homemade Mayonnaise

INGREDIENTS

• 1 free-range egg, yolk only
• 150-220 ml sunflower oil
• 1 teaspoon Dijon mustard
• salt, adjust accordingly
• pepper, adjust accordingly


INSTRUCTIONS

Whisk the egg yolk in a small bowl with the mustard, 

Continue to whisk and add some of the oil with a steady thin stream.   It will thicken up.

Then add more oil.  It will loosen the mayonnaise up.  Keep whisking until it thickens up again. You will find the color turning paler and brighter.

Gradually add the remaining oil while whisking continuously. 

Then add some salt and pepper accordingly.  Transfer it to a small dipping bowl and serve.


A Date With Bok Choy

BokChoyR3.jpg

White Bok Choy, 白菜

BokChoyR2.jpg

I am home alone and a simple meal with bok choy is what is in store for me.  Apparently, it's a top nutrient-dense food full of antioxidants, vitamins and minerals that are associated to promoting strong bones and good eye health.   That means a good amount of vitamin K, vitamin C, and vitamin A.

Studies have shown that this Chinese cabbage is part of the cruciferous family of vegetables that contains glucosinolates (more than most other cruciferous vegetables) which is associated to a reduced cancer risk.

No drooling please but I'm dining with a cancer-fighting warrior tonight. 

Stir Fried Bok Choy

INGREDIENTS

• 1 bunch bok choy
• 2 tablespoons oil
• 3 cloves garlic, crushed
• salt, adjust accordingly


PREPARATION

Cut off the ends of the bok choy and then cut the vegetable lengthwise.   Wash all the soil off and then let it dry.


INSTRUCTIONS

Add the oil in your wok and turn the heat up high. 

Add the garlic and swirl it around the wok, then quickly add the halved bok choy. 

Stir quickly so that the garlic doesn't sit at the bottom and burn.  Keep stirring for about a minute or until the green part of the vegetable starts to wilt. 

Add some salt, stir, and cover with a lid.  Turn down the heat and continue to let it cook for another 30 seconds.

The leaves should be soft and the stems should have a slight crunch to it.


NOTE

Bok choy can be steamed and boiled as well.  You can easily find this on a menu in a Chinese restaurant served with oyster sauce.

Rainbow Fresh Spring Rolls

Ingredients for a colorful fresh spring roll.

Rice paper wraps filled with raw vegetables.

Rice paper wraps filled with raw vegetables.

RainbowSummerRolls3.jpg

I love Vietnamese fresh spring rolls, also known as summer rolls.  Rice paper wraps offer another gluten free wrap option.  Be sure to double check the ingredient list as not every rice paper wrap is gluten free if you are looking for this option.

Just like nori for making sushi maki, rice paper wrap can be used to roll up anything you can think of.  My kids like to make their own and they can get very creative with it;  imagine a fresh fruit coulis drizzled over it—blueberry to be precise.  I am kindly reminded by them that I a missing a spectrum of blues, indigos, and violets for it to called a rainbow.

Here's a blend of my veggie fruit wrap.  It's a light starter and a pretty bite size treat for everyone.

Rainbow Rolls

INGREDIENTS

• 1 carrot
• 1 red pepper
• 1 mango
• 1 cucumber
• 1 avocado
• A handful of mint leaves
• Rice paper , 22 cm

PREPARATION

Cut and slice your vegetables into thin strips.   Place them into separate bowls.

INSTRUCTIONS

Prepare a pan filled with a half inch of warm water.    Take a piece of rice paper and place it in the pan of water, flipping it quickly so that both sides are wet and then place it on a flat work space (I use a silicone or wooden chopping board).  Use your fingers to rub in the water and to flatten out the rice paper.

Place your sliced vegetables about a a third up of the rice paper and leaving an inch and a half on the sides.  Then line up two or three pieces of mint leaves next to it and another line of avocado so that you will have 3 rows neatly lined up next to each other. 

Start from the bottom and roll up into your first line of vegetables, tuck in the sides of the rice paper and continue to roll up.

Using a sharp knife cut the rolls in half and then in thirds.  Line them up on a tray and serve immediately.  You can also plastic wrap it and place it in the fridge to serve later.

NOTE

You don't want your rice paper to be too wet otherwise it will tear. Give it a give dip on both sides and quickly take it out as it will continue to absorb the water once it is placed on your flat work space.

Practice makes perfect.  Keep your rolls tight when rolling and make sure not to overstuff your rolls. 


Beetroot Brownies

Beetroot Brownies

INGREDIENTS//Yields 12 squares

• 1 medium size beetroot (approximately 250 grams), finely grated
• 130 grams dark chocolate, chopped
• 130 grams butter
• 3 tablespoons agave or honey
• 100 grams chestnut flour
• 30 grams cacao powder
• 3 whole eggs, whisked
• A pinch of sea salt
 

INSTRUCTIONS
 

In a medium size pot add some water and boil the beets until soft.  Then use a sieve and drain all the water out.  With the help of a back of a spoon, press into the beets to squeeze out any excess liquids.  Set it aside.

Melt your chocolate and butter in a bain-marie.  Then pour it into a blender, add the beetroot and the agave, and whiz it up.  Set it aside.

In a seperate mixing bowl combine your chestnut flour, cocao powder, and egg.  Mix by hand.

Add a pinch of sea salt and fold in the chocolate beetroot mixture.

Line a baking tray with parchment paper and pour in your mix.

Pop it into your pre-heated oven at 160° Celsius and bake for 30 minutes or until you can slide a knife into it and pull it out clean.


Eggplant Rolls

Eggplant Rolls on a bed of arugula.

Eggplant Rolls on a bed of arugula.

Spring break has begun in Paris.  For those sticking around in Paris we are blessed to see and feel the sun for many days in a row now.   Sidewalk cafés are once again full of life but they usually are even with the tiniest bit of sunshine out.

My family has gone off to the south of France and I find myself twiddling my thumbs after days off on my own—four days to be exact!  I watched the entire season of Big Little White Lies (I stayed up til 3 a.m.).  So as you see, I do have my OCD moments but usually in the kitchen and not in front of the telly.   I also managed to squeeze in two films, some light reading, evenings out with friends, and two very long, peaceful runs along the canal, topped off with a light yoga routine.

I was conjuring up what I could do next, thus the twiddling of the thumbs.  That's energy zapping you know, so off to the fridge I went.  I panicked when I saw two large eggplants in sight —for what's a girl to do with two nights left on her own with two large eggplants?   The fridge had to be emptied since I would be off to the south of France for the long weekend to join my family and the thought of waste just boils me right up.  

The original intent was to make fried eggplants for the whole family.  Fried eggplants minus the family equals fried eggplants for one!  Ooh, now that just screams out heart attack to me.   I decided otherwise.   Let's just say I got the eggplant rolling—literally!


Eggplant Rolls

INGREDIENTS//Yields 14-16 rolls

• 2 eggplants, peeled and sliced (1/4 inch)
• 250 grams ricotta cheese
• 50 grams parmesan cheese, grated
• 1 egg, whole
• Fresh basil, finely chopped
• salt and pepper, adjust accordingly
• 1 cup (225 grams) tomato sauce
• salt and pepper, adjust accordingly

INSTRUCTIONS

Rinse the eggplant, cut off the ends, and peel the skin off length-wise in alternating stripes with skin and no skin.

Use a mandoline or a sharp knife to cut the eggplant in 1/4 inch slices.

Brush the slices with olive oil and place them on a baking sheet. 

Place it in a pre-heated oven at 200° celsius ( approx. 390°F°) for 8-9 minutes or until golden.  Take it out and let it cool.

Prepare your filling by combining the ricotta, parmesan, and egg.  Mix well.

Stir in the fresh basil and add some salt and pepper.

Set it aside.

Take out your baking dish and spread a thin layer of tomato sauce on the bottom of the dish.

You can start your rolling process by taking a spoonful of filling and placing it at the wider end of the eggplant.

Roll up the eggplant as tight as possible and place it in the baking dish.   Line them up alongside of each other as you continue to roll the rest of the eggplant slices.

Top off with some tomato sauce and mozzarella cheese.

Place it in a pre-heated oven to 175° celsius (approx. 350° F) and let it bake for 30 minutes or until the cheese melts and has a golden color.


Sugarloaf Chicory Kimchi

I had a sugarloaf chicory on hand taking up a lot of refigerator space so I thought I would cram it all into a jar.  Yep I did, but before that I massaged my chicory leaves with coarse salt, let it rest, rinsed it out, made the magic spicy sauce and then jammed it all into a mason jar, and sealed it shut. 

I forgot about it for a day or two, checked in on it to see if it was alive, opened the lid and heard it wheeze, sealed it back shut again, and forgot about it for a week and a half in the fridge letting it ferment before I stuffed myself silly with it for the rest of the week that followed.

Call it an Asian (Korean) spicy sauerkraut if you like but it's kimchi.  Kimchi is usually made with napa cabbage or daikon radish and is fermented.  It goes through a lactofermentation process where all the natural bacteria feast on the sugar and starches in the food producing lactic acid.  This creates an environment for the good bacteria to foster and preserves the food from the bad bacteria.  The good bacteria known as probiotics are believed to help in digestive health.  Kimchi is a great additional source of probiotics. 

I consider myself a freshman in a Fermentaion 101 class so I often poke and look around in what I am fermenting, stick my nose in it and sniff about a hundred times before I ingest it.  So far to date, it all tastes good to me and no belly aches!


Presto Pesto with Kale

Pasta with kale pesto, roasted carrots and zucchinis.

Pasta with kale pesto, roasted carrots and zucchinis.

Presto pesto!  This is one of those things you can whip up in a jiffy and keep for a week in your fridge.   A jar of this green pesto superfood goes quick.  It's great for pasta, pizza, and as a dip.

Kale pesto

Kale pesto

Kale Pesto

INGREDIENTS//Yields one 500 ml mason jar

• 100 grams kale leaves
• 1 clove garlic
• 80 grams raw almonds or pine nuts
• 90 grams parmesan cheese
• 1 lemon, juiced
• 125 ml olive oil

INSTRUCTIONS

Add the first four ingredients in a food processor and whiz it all up

Drizzle in the olive oil with the rest of the ingredients.

Once you have a smooth consistency transfer it to a mason jar.

NOTE

This stores in the fridge for up to a week. Just add extra olive oil to cover the surface, cover it, and keep it in the refigerator.

Cauliflower Parsnip Purée

The parsnip seems to be a star vegetable this winter.  It just had a portrait write-up about it in the French journal Libération with a soup recipe included by Alain Ducasse.

Parsnip is the je ne sais quoi in soups and it's what adds that special something to the stock of the pot-au-feu.  In the ancient times, the Roman Emperor Tiberius imported this vegetable from Germania and it was used to strike the bell in the bell tower.  In the Middle Ages, it was one of the vegetables cultivated by the monasteries.  It was overshadowed by the growing popularity of the potatoes in the 18th century and has just finally made its comeback to the dining room table.

Cauliflower Parsnip Purée

INGREDIENTS//Serves 6

• 1 Parsnip, peeled and chopped
• 500 grams cauliflower, chopped
• 1 clove garlic, roasted
• 2 dollops crème fraîche
• 30 grams butter
• 1/2 bunch chives


INSTRUCTIONS

In a large pot of water add some coarse sea salt and the parsnip and bring it to a boil, then turn the heat down to simmer.

Cook for 15 minutes or until you can stab a fork through the parsnips.  

Add the cauliflower and cook until tender.

Pour your parsnips and cauliflower into a colander and drain.

Transfer it to a large mixing bowl (if mashing by hand) otherwise transfer into a food processor.

Combine the rest of the ingredients, garlic and crème fraîche. 

Mash with a fork or blend it all together in your food processor.  Adjust accordingly with some coarse sea salt. 

Garnish with some chopped chives.


Parsnip, The New Carrot Cake.

Parnsip, the new carrot cake.

Parnsip, the new carrot cake.

If you love carrot cake, you'll love the parsnip cake.  Try replacing your carrots with this great winter vegetable.  I happen to have an abundance of them in my weekly basket these days and cakes seem the way to go with the kids' palate.

As the Thai's say, "same same but different".  It's a great alternative to using carrots if you happen to have plenty of them and looking for something to do with it. 

Last but not least, don't forget to grate some lemon zest over your frosting for that extra zing!

Parsnip Cake

INGREDIENTS//Yields 1 loaf

• 2 eggs, whole
• 150 gram packed brown sugar
• 150 ml (3/4 cup) canola oil (non-gmo)
• 150 gram all purpose flour
• 1 teaspoon cinnamon
• 1 teaspoon baking powder
•1 teaspoon baking soda
• 1/2 teaspoon salt
• 2.5 cups parsnip, grated
• 50 grams walnuts, chopped


FROSTING

• 150 grams cream cheese, softened
• 30 grams butter, softened
• 65 grams (1/2 cup) powdered sugar
• 1/2 lemon (untreated), zest


INSTRUCTIONS

In a large mixing bowl, add your eggs, sugar, and oil and mix.

When well combined add the flour in three parts.

Add the cinnamon, baking powder, baking soda, and salt.  Mix until well combined.

Finally fold in your grated parsnip and walnuts.

Preheat your oven to 175° celsius (350° F).

Pour the batter into a loaf mold and pop it in the over for 30 minutes or until you can slide a knife into it and pull it out cleanly.  Take it out of the oven and let it cool.

FROSTING

In a small mixing bowl, combine the cream cheese and butter.  You can hand beat these or use a beater mixer.

Add in spoonfuls of the sugar at a time and beat until smooth. 

Spread it over your cooled cake and sprinkle the lemon zest over it.


Dorayaki...Les délices de Tokyo.

Dorayaki(どら焼き)

Dorayaki(どら焼き)

I just watched Sweet Bean by the Japanese director Naomi Kawase.  In France the title is translated as Les Délices de Tokyo.  It's a beautiful and sad drama film that centers around a middle-aged man and an elderly woman working together in a dorayaki stall.

Dorayaki is like a pancake sandwich with a sweet red bean filling.  It's a rare treat to find it fresh off the grill unless you pass a stall like the one in the movie.  

My family used to receive a box of these on occasion.  In the box, the dorayaki would be individually cellophane-wrapped.  Opening one up was like unwrapping a little gift each time.

There is a scene in the film when the elderly lady is teaching the man how to make the red bean paste filling.  My ears piqued and the drama film quickly turned into a cooking lesson.  I love adzuki beans and they are commonly used in Asia to fill confectionaries such as these dorayakis.

Taking mental notes I knew what were to become of my dried adzuki beans in the pantry.  I couldn't wait to make my own filling for my own dorayaki.  

After the film, I prepared my beans by soaking them in water for use the next morning.  My stewing session the next day took a lot longer than the film lasted and longer than I imagined.  Man, those beans just didn't give.

I prepared the simple pancake batter and after waiting impatiently for the bean paste filling to be ready, finally,  I could make a dorayaki.   And guess what?  I ate it straight off the grill. 

I think my pancakes could have been thinner and moist,  and I could have been less heavy-handed on the filling too.   I'll share the recipe with you another time but try and catch the film if you can.  It may stir you in other ways but it certainly got me moving to make these Japanese delights.  Once I perfect them I'll let you know!

White Bean Spinach Soup

When it comes to white beans, I think cannellini.   I usually go for the ones in the tin and never really think much about them.  Then one day Lady Jo asked me, "what's a white bean?"  It seems like a simple question but it's a loaded one.  I answered definitively, "Cannellini", quickly followed by "Non?— oh, you mean haricot blanc?", then with a tinge of doubt,  "Flageolet?"

Well, a month later I find myself with a sack of white dried beans my husband picked up at the market and they were not any of the white beans mentioned above.  These are called Soissons beans and resemble a lima bean.

Apparently this variety of bean is culitvated in Soissons located in Aisne, a department north east of Paris.

These Soissons beans turned out to be plump and flavorful.  Now the question is to soak or not to soak your dried beans beforehand.

White Bean Spinach Soup

INGREDIENTS//Serves 6

• 500 grams dried white beans
• 1 onion, chopped finely
• 3 cloves garlic
• 1 bay leaf
• 1.5 litre stock
• 150 grams spinach

PREPARATION

Soak white beans in water overnight.


INSTRUCTIONS

In a large Dutch oven, add some olive oil and sauté the onions and garlic until the onions becomes translucent and turn golden.

Add the stock and beans, cook until boiling point, then turn down the heat, cover and let it simmer for about two to two and a half hours or until the beans are tender.

Add the spinach and keep the lid on.   Let it cook until it wilts, stirring occasionally.

Let the soup cool.  Scoop out the spinach and half of the beans and put it in a blender and whiz it up into a soup.  

Pour it back in with the rest of the beans.  Reheat on low temperature before serving.


Pumpkin Cookies

Pumpkin cookies in a goûter bag stitched and designed by Marie-Joelle.

Pumpkin cookies in a goûter bag stitched and designed by Marie-Joelle.

I came home from work with a bunch of fresh pumpkin slices and quickly divvied it up and made some soup out of it along with a batch of these home baked pumpkin cookies.   I didn't have to labour over deseeding, peeling, and chopping up the pumpkin so it was a time-saver. 

Goûter in France is snack time.  You cannot deny the kids this rite since it's considered a light meal, usually a piece of baguette with marmalade or chocolate spread or better yet,  a fresh pain au chocolat right from the bakery.  Although nowadays it seems to be easily replaced by store bought cookies and cake. 

The kids stay through the primary school after-school program so they have to pack their own snacks.  Thanks to our friend and neighbor, Marie-Joelle, who has handmade this cute goûter bag as seen in the photo, it has made each night before bedtime cheerful; that is, the kids look forward to filling their personalized goûter bags up with a couple of treats.  This week it's clementines and pumpkin cookies!

Pumpkin Cookies

INGREDIENTS//Yields 28-32 cookies

• 320 grams (2 1/2 cups) all-purpose flour
• 1 teaspoon baking soda
• 1 teaspoon baking powder
• 1/2 teaspoon salt
• 1/2 teaspoon ginger, finely grated
• 1/2 teaspoon nutmeg
• 1 teaspoon cinnamon
• 113 grams butter, softened
• 300 grams granulated brown sugar
• 225 grams pumpkin purée
• 25 grams pumpkin seeds


INSTRUCTIONS

Sift the flour, baking soda, and baking powder into a large mixing bowl.  Then add your spices: ginger, nutmeg, and cinnamon.  Set it aside.

In a seperate large mixing bowl, mix the sugar and butter together until creamy and add in the pumpkin purée.

Slowly add in the dry ingredients in three parts and mix well.

Put it in the refigerator fo 30 minutes or you can drop spoonfuls of the mix onto the baking sheet straight away (I like to roll my cookie dough into balls so I put the mix in the fridge to harden up).

Drop some pumpkin seeds on each cookie and press them into the dough.

Pre-heat your oven to 175° celsius.  Bake for 15-18 minutess until golden.

Take it out of the oven and let it cool.

Jerusalem Artichokes a.k.a Topinambour

Jerusalem artichokes straight from the earth.

Jerusalem artichokes straight from the earth.

Jerusalem artichokes known in France as topinambour can be eaten raw, cooked, and marinated.
Since the first time I heard of this vegetable was in France I figured there was some special French way of preparing them, and who better to get a recipe from—Mamie Jacotte.

Jerusalem artichokes also known as topinambour.

Jerusalem artichokes also known as topinambour.

I was quickly pre-empted by my husband who told me that it was a "war vegetable" , thus better to leave it behind and not be reminded of it.   Ok, so then I asked elsewhere and it seems most people either sauté these tuber vegetables, boil or steam them and make a purée with potatoes, or roast and make a gratin out of them.  Coat it with a whole lotta fat and I mean whole fat and you can't go wrong.

Then I read somewhere that it could be eaten raw.  I took a little bite out of it and it was sweet and crunchy like a water chestnut and slightly nutty and artichokey.  They are not at all from the same family and they do not come from Jerusalem (they come from Native America)—go figure!

Apparently, it supplies a lot more potassium than that of the banana (I understand that a banana is an easier snack to reach for) and a good choice of vegetable for people with type 2 diabetes since it is low in starch and high in carbohydrate inulin.

Winter Medley Salad

INGREDIENTS//Serves 2-3

• 300 grams Jerusalem artichoke, julienned
• 1/2 lemon, juiced
• 100 grams beetroot, julienned
• 1 endive
• 100 grams of blue cheese, goat cheese, or sheep cheese, crumbled
• 50 grams walnut, roughly chopped
• balsamic vinegar
• extra virgin olive oil


INSTRUCTIONS

Wash and peel your Jerusalem artichokes and place them in a bowl of water with lemon juice to keep them

from oxidizing.

Use a mandoline to julienne your Jerusalem artichokes and beetroot.  Transfer the raw, julienned vegetables into a medium size mixing bowl.

Add your roughly chopped endive to the mix.

Drizzle some balsamic vinegar and olive oil, add your cheese and walnuts, and toss.


NOTE
 

Instead of chopping your endive, you can use its full leaf and serve the salad in it.  Line a bunch of endives up together and fill it in with small portions of the salad.   This makes a pretty addition to the table.


Teff Patty. Have it your way...

Teff patty on a bed of sautéed cauliflower & pumpkin topped off with parsley and mozzarella.

Teff patty on a bed of sautéed cauliflower & pumpkin topped off with parsley and mozzarella.

Ok folks, so if you caught my last post you'll know that this is my second experiment with teff grains.  I've gone from pancakes to patties.  The original intent was to make a veggie burger for the family but I found that the patty didn't taste as good in between buns than simply plated on a bed of sautéed vegetables.

I tried a few different vegetable combinations with the teff grains but I kept getting mushy-like veggie patties which is why putting it in between buns didn't help the matter.    It's a stomach stuffer, if you know what I mean.

Roasted mushrooms seem like the ingredient to add for a meatier consistency.  You don't want your veggie patty to be waterlogged which is why roasting is the way to go—it gets rid of the liquid. 

Teff Burger

Teff Burger

I finally came up with this combination that I am sharing with you but I highly suggest plating it on some seasonal vegetables with a crunch to give an added texture to this dish.  I dressed it up as a burger for the kids who ate it willingly albeit with some raised brows.  So, have it your way...

Teff Patty

INGREDIENTS//Yields 10 medium size patties

• 100 grams (1/2 cup) teff grains
• 2 cups vegetable stock
• 350 grams mushrooms, finely chopped and roasted
• 220 grams pumpkin, diced and roasted
• 100 grams (1/2 cup) mung beans
• 1 tablespoon flax seeds, grounded

INSTRUCTIONS

Add two cups of vegetable stock and bring it to a boil.  Add the teff and let it cook on medium heat with a lid over it.   After 15-20 minutes, all the water should be absorbed and the teff will be cooked.  Let it cool.

In a pre-heated oven at 175°C, roast your mushrooms and pumpkin.    Then, take it out of the oven and let it cool.

In a large mixing bowl, combine the teff, mushrooms, pumpkin, cooked mung beans, and ground flaxseed.

Stir everything together.  Wet your hands and form individual patties.

Place your patties In a oil heated casserole on medium heat.  Cook each side for 4 minutes.

Serve it on a bed of crunchy veggies with a slice of cheese and you've got a veggie delight!


NOTE

I used dried mung beans as it is a staple in our house.   Lentils, black beans, red beans can all be good replacements.  Experiment with the bean of your preference.