La Chandeleur...the day we must eat crêpe.

CrepeOrig2.jpg

February 2 marks the halfway point between the winter solstice and the spring equinox making it a cross quarter day and known as La Chandeleur in France.  Basically, it's crêpe day in France based on traditions and superstitions.   Stemming from both pagan and religious origins, the color and shape of the crêpe symbolizes the sun as days become longer and warmer; while winter wheat is being sowed, leftover flour from the previous harvest is used to make these crêpes in hopes of prosperity for the following harvest.   The Christian orgins involve Jesus so I won't get into further detail, just that He is the "light of the world", hence Festival of the Lights (La Chandeleur).

I think every French person has earned their rite of passage in crêpe making and they'll be more than happy to tell you what's wrong with yours.  You can never pin them down to exact measurements.  They just know.  I usually have to show my batter to a French friend to make sure I've got the consistency down pat.  That's just one hurdle because forming those perfectly round crêpes is another.   Then there is the decision making for the filling and the fine art of folding.  

Finally with a stack of crêpes in front of us and a choice of fillings:  jams, fresh sliced fruit, whipped cream, chocolate sauce, salted caramel sauce, lemon halves, granulated sugar, and a bit of Grand Marnier (my husband's preference).   My daughter and son, who have eight and six years on me in crêpe tasting, give me articulated critiques after each crêpe we have personally created and devoured together.

Basic Handmade Crêpe

INGREDIENTS//yields 15

• 300 grams all-purpose flour
• Pinch of salt
• 4 eggs
• 600 ml milk
• 1 1/2 tablespoons sunflower, vegetable, or olive oil or (30 grams unsalted butter)

INSTRUCTIONS

In a large mixing bowl make a well in the center of the flour.  Add a pinch of salt.

Add one egg at a time into the well of flour.  Whisking each egg in with some flour each time as to avoid clumps.

Gradually add in the milk, stirring to combine.

Add the oil and continue to stir until it's well integrated.  The texture of your batter should be smooth and the consistency should be thin but not too thin (think Half and Half).

Let your batter rest for 30 minutes or longer.

Lightly coat your crêpe pan or a non-stick pan (I used a 9 1/2 inch or 25 cm pan) with some oil.

Holding the pan with one hand and using a ladle with the other, spoon out some batter and pour the batter into the pan while swirling your wrist so that the batter spreads and covers the surface of the whole pan.  Slighty brown both sides by flipping the crêpe ounce it turns a soft yellow color with golden speckles or simply use a spatula to turn it over.

NOTE

Depending how large your ladle is you will have to figure out the right amount of batter just enough to thinly spread and cover the surface of your pan.  I filled half my ladle for the size of my pan.


Hijiki Tofu Patty

Reminiscing my Dojo days in NYC...

Back in the 80's and early 90's, vegetarian restaurants were few and far between to be found in New York.  As far as I could recollect there was Dojo which was a vegetarian friendly restaurant, Angelica's Kitchen, a vegetarian restaurant and Souen, a macrobiotic restaurant.   I ate at these places so often when I was a student at NYU that it has pretty much shaped the way I eat regularly.  I love all things tofu, sea vegetables, rice, beans, and veggies.  Give me a hijiki tofu burger from Dojo's or a dragon bowl from Angelica's anyday.

Since Dojo's hijiki tofu burger and their carrot ginger dressing recipe are top secret,  I can only do a rendition of it— but it's oooh, so goodThis is one of my fave comfort foods and it runs in the family. 

Serve it along with some brown rice, fresh raw veggies, topped off with Dojo style carrot ginger dressing. 

DRIED HIJIKI

DRIED HIJIKI

The yin and the yang of food...

Growing up my mum always told me "oh, you're too yin",  meaning that my body was deficient in qi or vital energy.  I always had cold hands and feet no matter how hot and humid it was on a summer day which is a symptom of yin.  I even wore socks under my duvet covers.   She would place bowls of tonic soups in front of me urging me to eat.  Soups such as yam and ginger slices, and Chinese herbal chicken soup comprising of korean ginseng, red dates (jujubes or hong zao), astragalus root (huang qi), codonopsis root (dang shen), and Chinese yam (huai shan) . Then there were the tea concoctions such as astragalus, red dates, and goji berries.   These replenishing soups and teas were to increase my yang in order to restore the balance in my body.  If I had chapped lips, I was suddenly told "oh, you're too yang", and that was quickly followed up with more soups and teas such as the green bean soup (mung beans or lu duo) with rock sugar and the chrysanthemum tea to increase my yin.

The relative levels of yin and yang in our bodies are continuously changing and they need to coexist harmoniously.  Most of us are naturally more yin or yang.   When out of balance symptoms can be observed like those cold feet and chapped lips of mine.

Hijiki is one of hundreds of seaweed types that can be classified as a brown seaweed and is considered yang.  Seaweeds break down into three broad basic categories: red algae, green algae and brown algae.  You can buy dried hijiki at any of the Japanese or Korean food stores on or near rue St Anne in the 1er or 2e arrondisement of Paris.  It is first soaked in water and then drained to use in cooking with other ingredients.

Hijiki Tofu Patty

PREPARATION

Soak hijiki in 2 cups of water for 30 minutes.
Press and drain tofu for 20-30 minutes.

INGREDIENTS//yields 8-10 patties or 4 burger-size patties

• 5 grams dried hijiki seaweed
• 12 ounces firm tofu
• 2 cloves garlic, minced
• 1 teaspoon ginger, fresh and finely grated
• 1 medium carrot, grated
• pinch of ground white pepper
• 1 tablespoon white miso
• 1 tablespoon toasted sesame oil
• 1 teaspoon tamari sauce
• 2 scallions (white and light green parts finely chopped)
• 2 teaspoons sesame seeds, toasted

INSTRUCTIONS

Soak dried hijiki in warm water for 30 minutes, rinse and then drain.  Set it aside.

To rinse and drain liquid from the tofu.  Cut through tofu in 1/2 inch slices and press between heavy cutting boards to drain any excess water for about 30 minutes or simply use a cheese cloth to squeeze out the excess water.  The tofu will be crumbled anyway.

Sauté the carrots, garlic, and ginger in a tablespoon of vegetable oil until the carrots are limp.  Add a pinch of white pepper.  In a bowl, add the miso and crumble the tofu.  Use your hands to mix the crumbled tofu and the miso paste together. 

Stir in the cooked carrots and the hijiki.  Then add the tamari sauce, sesame oil, scallions, and sesame seeds. 
Mix it all together.

Form the mixture into round patties and place them on a baking sheet.  Bake until golden brown, about 30 minutes at 175° C (350° F).

Carrot Ginger Dressing
 

INGREDIENTS//yields 1.5 cup dressing

• 3 large carrots, peeled and chopped
• 1 large shallot, peeled and chopped
• 1/2 thumbs length fresh ginger
• 1 tablespoon sweet white miso
• 3 tablespoons rice vinegar
• 2 tablespoons roasted sesame seed oil
• 1/4 cup grapeseed oil, olive oil, or vegetable oil
•  4 tablespoons water

INSTRUCTIONS

In a blender or food processor add the carrots, shallot, and ginger and pulse until finely chopped.

Scrape down the sides with a spatula.  Add the miso, vinegar and sesame seed oil and blend together.

Add some water and slowly drizzle in the oil. 


NOTE 

I also like to add zucchini to the hijiki tofu patty mix.  You can simply add a half zucchini (grated) in with the carrot and sauté together.   Then follow the rest of the directions.  As I've said before any extra veggies I can sneak into a recipe makes me feel good, especially when I watch my kids gobble it up!


Pâté aux Pommes de Terre

Tourteauxpommesdeterre2.jpg
pâtéauxpommesdeterre3text.jpg

There was an interesting article in the NY Times a few months back.  It was about families in the city and in Brooklyn forming tight-knit communities who live in the same building or in the same neighborhood.  They were willing to sacrifice space and to stay put in their close-fitting apartments to forge their children's close relationships with their neighbor's children.  It then turns into a nice network between the parents where they can rest worry free knowing that their child is just next door, upstairs or downstairs.   Inevitably, gatherings and dinners are hosted between them deepening their relationships, and eventually leading to kid sleepovers and babysitting swaps.  

This story hit home.  I live in a 14-story building and I keep an open door policy the minute the kids get home.   They are usually rotating between our home and their neighborly friends' homes.  Instead of running through backyards, my kids are runnng down the hall or up and down between floors of our building.  They love this liberty of being able to run between their friends' apartments on their own.  I love it too since I know there is always a surrogate parent around to keep an eye out for them, one of whom is my neighbor Natalie.  

Nat is originally an Auvergnate (someone from Auvergne, located in the middle of France).  Just a tidbit of history, she comes from the ancient provinces of Bourbonnais (where the long string of Kings in France were sired) which now comprises territory in the department of Alliers, and some in the department of Puy-de-Dômes and Cher.  Alliers and Puy-de-Dômes make up part of the Auvergne region.   Fast forwardNat has a daughter who is in the same class as my daughter.  Needless to say, our daughters spend a lot of time together which in turn means we moms usually find each other around wine o'clock for a quick catch up and to pick up or drop off the kids.  It was during one of these times that I found myself in her apartment, glass of red in hand, learning how to put this charmingly simple pâté aux pommes de terre together.   A speciality dish from Bourbonnais—her personal tip to me was "lay that butter on"!

Pâté aux Pommes de Terre

INGREDIENTS//serves 6

• 1 medium size onion
• 4-5 medium size potatoes
• 2 pâtes brisée (tart pastry)
• Bunch of fresh flat parslely
• 50 grams unsalted butter
• 20 cl crème fraîche
• Salt and pepper according to taste

INSTRUCTIONS

Slice your onions thinly and put it aside.

Peel your potatoes.  Using a mandoline or a sharp knife slice the potatoes into slivers.  Salt them slightly and put them aside.

Take your tart or quiche pan (around 10 inches in diameter, 1-1/2 to 2 inches deep or 25 cm in diameter, 4 cm deep) and roll out one tart pastry and place it into the pan.  Press the pastry into the sides of the pan. 

Use a fork to poke some holes into the bottom of the tart pastry and place in the oven to bake for 3-5 minutes so that it's slighty baked.  Take it out of the oven and then begin layering your ingredients.

Getting back to your potatoes, wipe off the excess moisture and place a layer of potatoes covering the entire tart pastry.  Follow up with a layer of sliced onions, then snip (I love to use scissors in the kitchen) some parsley leaves all over.  Add slivers of unsalted butter all around.  Repeat the layering until you have used all your ingredients.

Roll out your second tart pastry and place it over the layered potato tart.  Fit the top into the tart.  You'll need to press down gently along the top edge of the tart pastry to even out the crust edges with the underlying tart.  Then press along the sides to seal the pastry together.

Take a paring knife and with the sharp tip cut out a one inch circle in the middle of the tart pastry.

Place it in the oven at 190° C (375° F) for 45 minutes.

The tart pastry should be golden brown.  Take it out of the oven. 

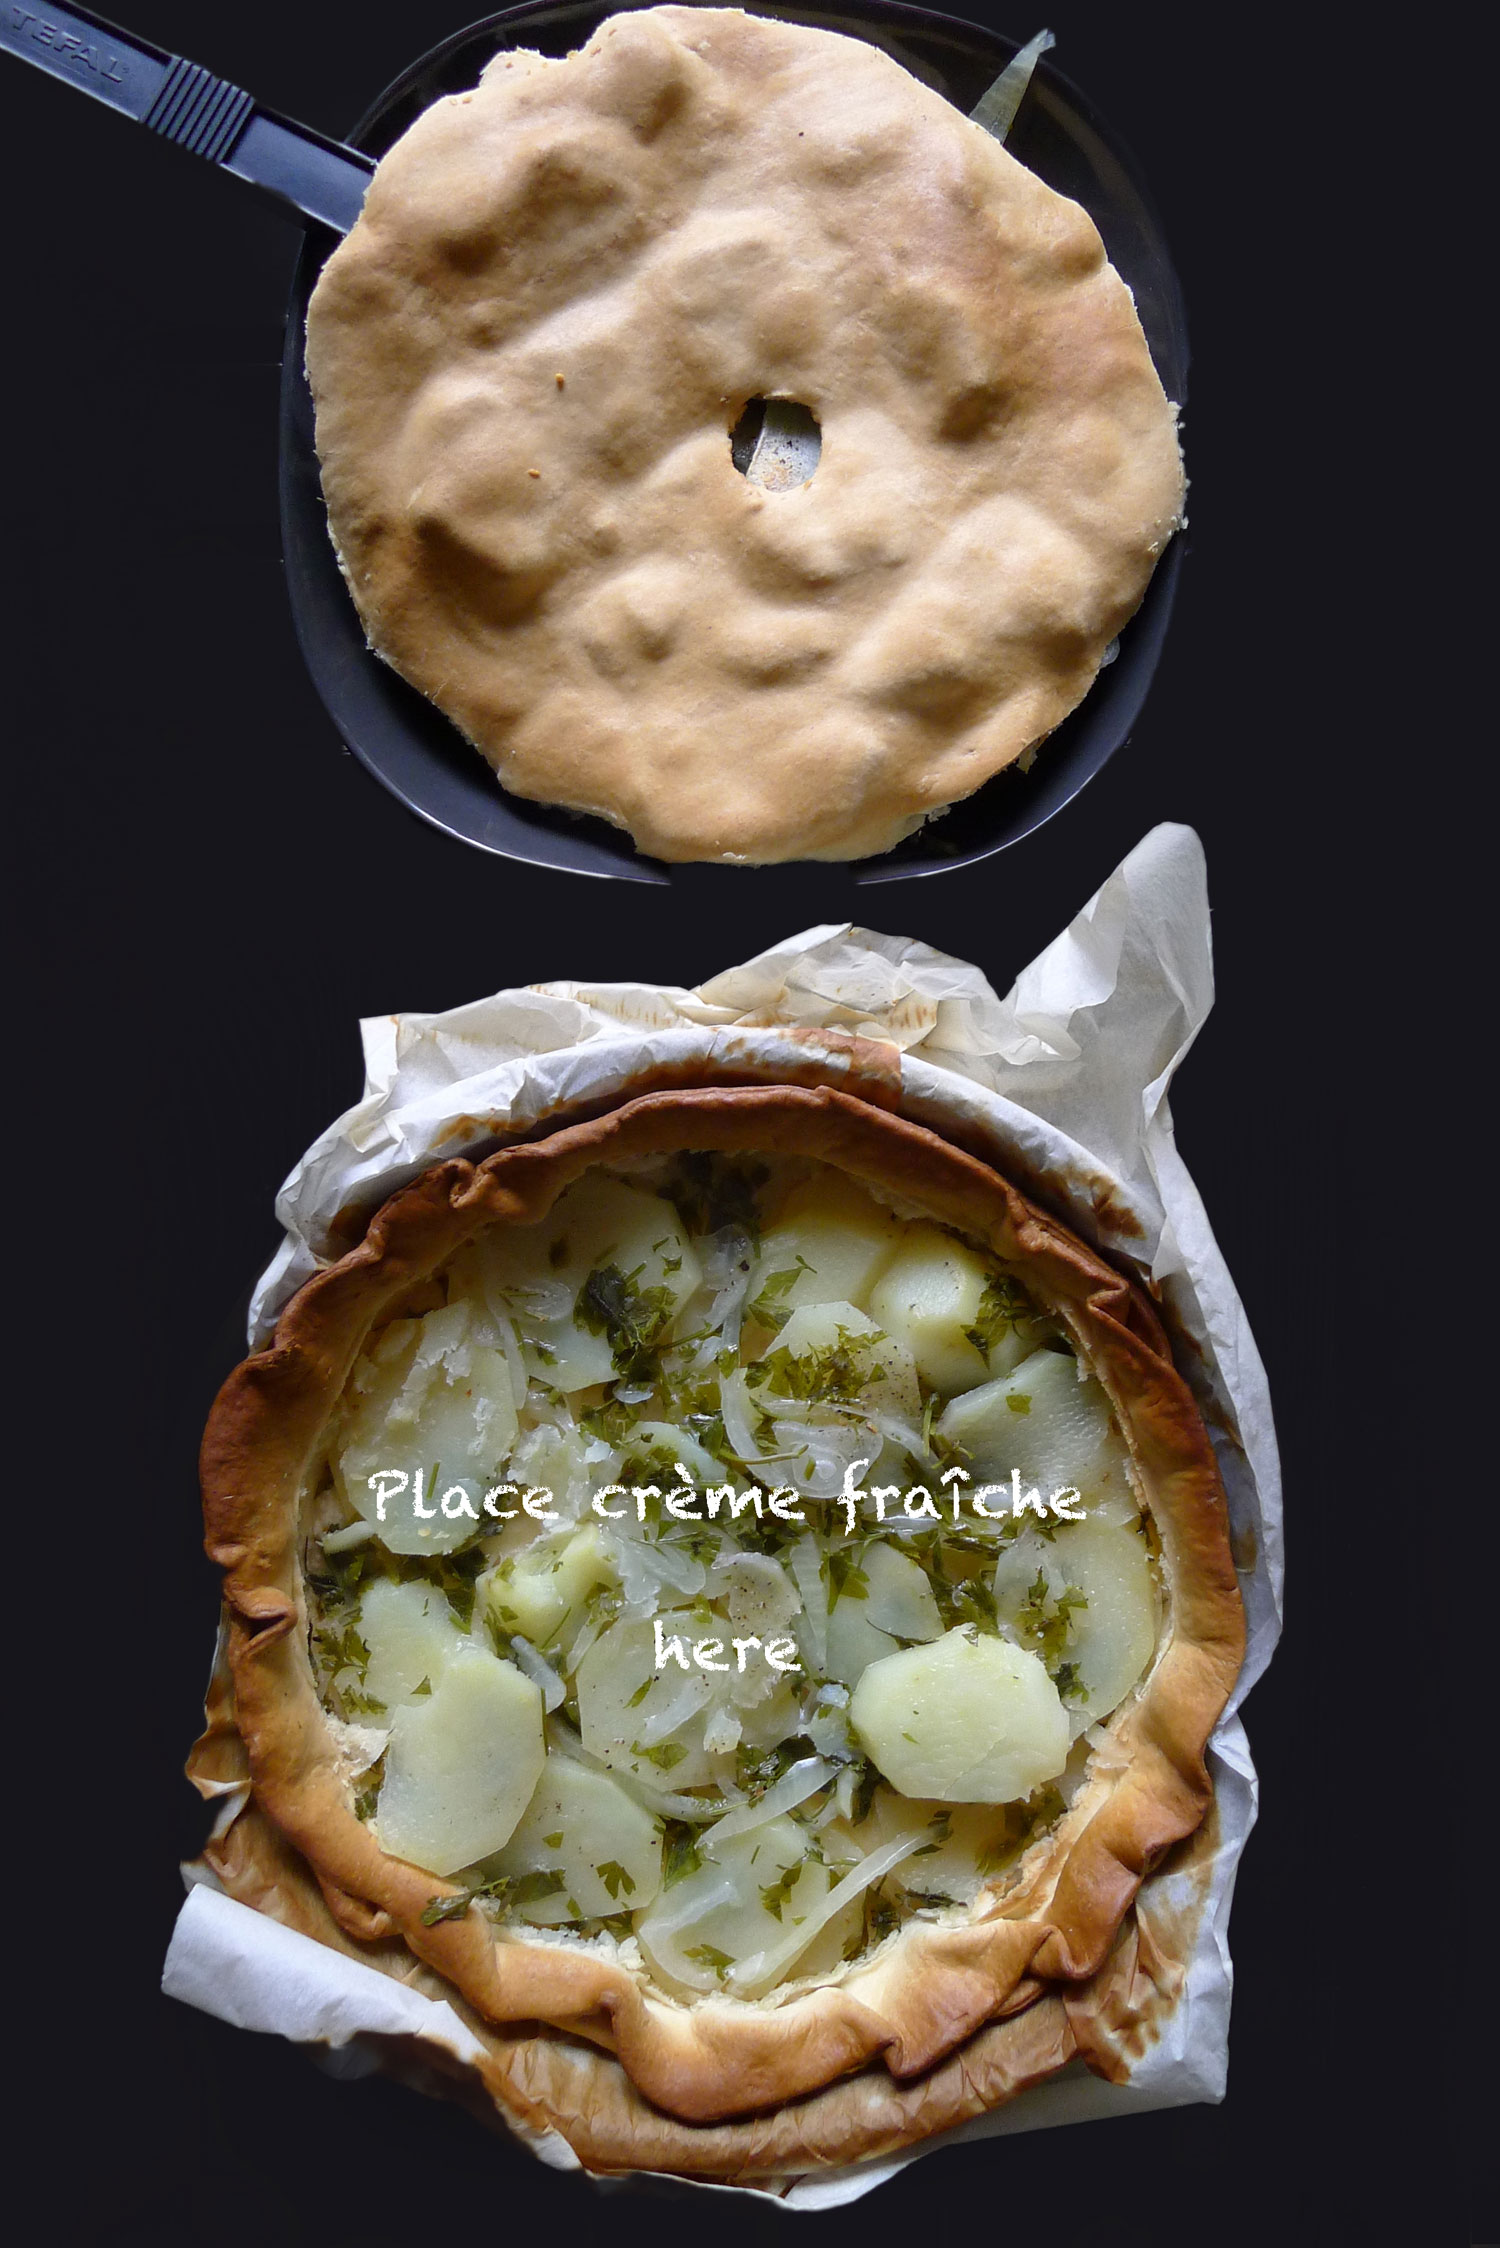
Keep your oven mittens on.  Hold onto the pan and use the paring knife with your other hand to cut along the interior seam of the potato tart.

Take a large size spatula and slip it under the top tart pastry and lift up to place it on a flat surface on the side.

Prepare the crème fraîche.  Add some salt and pepper and stir it up with a fork.  Scoop out the the crème fraîche and spread it all over the open face potato tart.   Finally, cover it with the tart pastry that you lifted off earlier and put it back in the over for 5-10 minutes so that the crème fraîche spreads through the layers.  Then it's ready to be served.  Bon appétit!

Healthy Baked Salmon Panko Crusted Nuggets

BakedSalmonPanko4.jpg
BakedSalmonPanko11.jpg

Panko is a Japanese breadcrumb.  It is airier, flakier, and crispier than the Western breadcrumbs.  It adds a delicate crunch to whatever you coat it on and seems to make everything taste good.   Pan means bread in Japanese and ko* means child.  I guess we could think of it as offsprings from a bread loaf?   A popular plate in Japan is tonkatsu which is a deep fried pork cutlet that is coated with panko crumbs.  It's usually served along side with shredded white cabbage.  I stopped eating meat a long while ago so I usually use fish, tofu, beans, or nuts as meat replacements.  I loved tonkatsu as a kid.  Because the tonkatsu is fried, I naturally craved the raw cabbage salad on the side to combat all that grease in my stomach.  So if you want to opt for a healthier alternative using the baking method, try this baked salmon panko crusted nugget recipe. 

Bull-Dog tonkatsu sauce is the dressing and dip for the cabbage salad and the tonkatsu.  The sauce has a flavor that consists of apple purée, tomato paste, carrots, prune paste, onions, and apricot purée.  It's basically an interpretation on the Worcestershire sauce suited for Japanese cuisine.  It is sweeter and thicker.   To reconcile my Asian taste buds and fond memories of my times in a tonkatsuya (tonkatsu house)—a place specialized in serving tonkatsu and perhaps other deep fried dishes, I serve this baked panko crusted salmon dish with a side of shredded white cabbage using the Bull-Dog tonkatsu sauce for myself.   Otherwise it's a versatile dish.  It can be a starter, snack, hors d'ouevre or main dish and you can serve it with a tartar sauce dip.

Baked Salmon Panko Crusted Nuggets

INGREDIENTS//yields 18 pieces

• 1 cup (50 grams) panko
• 1/2 teaspoon black pepper
• 1/2 teaspoon white pepper
• 1/2 teaspoon salt
• 2 salmon fillets, deboned (180-200 grams, approx. 6-7 ounces)

INSTRUCTIONS

Heat up a medium size pan over medium heat. 

Pour the panko crumbs into the pan and stir often until it turns golden brown.  Once golden brown, take it off the heat and let it cool.  Mix in your black and white pepper, and salt.

Pre-heat your oven to 200° C (between 390°-400° F)

Take your salmon fillets and cut them into little square pieces about 1/2 - 3/4 inch thick (about 1 1/2 cm).

Place the salmon into the panko crumbs and press down with your palms with enough pressure so that the crumbs stick.  No egg and flour involved here!  The piece of fish will flatten out a bit. 

Place each piece onto a baking tray.  Then place in the oven for 10 minutes unitl golden brown.

Homemade Tartar Sauce

INGREDIENTS//yields 1/2 cup

• 1 tablespoon cornichon, finely chopped (about 10 pieces)
• 1/2 shallot, finely chopped
• 1 teaspoon capers, finely chopped (about 10)
• 1 teaspoon dijon mustard
• 1/2 cup mayonnaise
• 1 lemon wedge
•  Salt and pepper (adjust to taste)

INSTRUCTIONS

Finely chop your first three ingredients: cornichon, caper, shallot. 

In a bowl, add the finely chopped ingredients with the mustard. 

Then fold in the mayonnaise. 

Squeeze some lemon.  Add salt and pepper to taste.

NOTE

I bought two salmon fillets that were 180 grams and 200 grams each.  I got 18 nugget pieces out of it.  Depending on how thin or thick you cut your pieces of salmon,  oven time may be shorter or longer.  Just be careful not to overcook your fish—nothing is worse than dried out fish. 

*My Japanese friend Yoshi pointed out to me that "ko" in panko is this Japanese character (粉 ) which means powder.  The "ko" I was referencing is this character (子) which means child.   It all sounds the same but has different meanings.   You think this is considered a homonym in Japanese?!


La Galette des Rois

Go figure, I've had an epiphany to make a King cake on the day of Ephiphany!  In France one can find a galette des rois before the first Sunday in the new year comes around.  Bakeries are cashing in on this lovely, flaky, delectable dessert in anticipation of Epiphany, on January 6th.  I decided to spare some euros this year and make one myself, much motivated by the fact that my then four-year-old son came home with the recipe from his teacher at school.  If she can do it with a class of twenty-four four-year-olds, I can certainly manage one with my two kiddies. 

In the French tradition,  a fève (a bean) is placed in the galette des rois.  Nowadays it's replaced by tiny figurines of some historical, religious representation or some beautiful collectible designy things.  Umm—I think this would be a choking hazard in the U.S.?  Anyhow, the fun bit is that the youngest child in the group you are sharing this galette des rois with goes under the table and shouts out the names of whom the pieces of cake should be distributed to.  The lucky one who gets the fève in their piece of cake is then king for the day and gets to wear the crown and choose his queen.  Otherwise, as my daughter would say— queen for the day and then choosing her king.  

We made our own crowns to go with this king cake but golden crowns (sort of similar to slimmer versions of the Burger King ones but without its logo)  are given along with the cakes that you buy at the bakery and even the ones sold in the supermarket.  Here's a fun fact, apparently the Elysée Palace, the official residence of the President of the French Republic is not served a galette des rois with a fève in it due to rules of etiquette.  I suppose just in case he doesn't draw the king?

La Galette Des Rois

INGREDIENTS//serves 6

• 2 puff pastry
• 100 grams butter, softened
• 100 grams sugar
• 4 large eggs, divided (for egg wash)
• 100 grams of almond flour (ground almond usually made from blanched almonds without skin)

Egg Wash

• 1 egg, yolk
• 1 egg, whole
• 1 tablespoon water

PREPARTION

Cut each puff pastry to 24 cm ( approx. 9.5 inches) in diameter. Keep them refigerated until ready to use. Otherwise it gets soft and sticky and becomes hard to work with.  

BAKE TIME

Total baking time is 1 hour.  Starting off at 180°C (350°F) for 20 minutes, then lowering the temperature to 160°C (320°F) and baking for 20 minutes, and then at 145°C (290°) for the remainder of the time.

INSTRUCTIONS//serves 6

Filling:  Cream the butter and the sugar together with a mixer or by hand using a whisk in a medium inox bowl.  To do so,  mix the butter until it looks whitish in color.  Then add the sugar and mix well, working it into a smooth mass.

Add one whole egg, mix, and add half the almond flour.   Then add the second whole egg.  Continue to mix and add the rest of the almond meal.  Then put it aside until ready to use.

Optional: You can use a pastry bag (piping bag) for your filling using a large round tip.  Put it aside until ready to use.

Egg Wash:  In a small bowl mix one egg yolk and one whole egg together.  Add a tablespoon of water and mix.  Set aside until ready to use.
 

Take out one of the refigerated puff pastry and and lay it out on a silicone baking sheet or parchment paper.   Fill it in with the almond filling either using the pastry bag or just a spoon to spread it out.  If you are using the pastry bag, hold it up horizontally and squeeze out your filling starting in the center moving in a clockwise direction reaching about 2 cm (approx. 1 inch) before the edge.  If you are using a spoon, scoop the filling and spread it evenly around the puff pastry leaving the same 2 cm around the edge.

The French use a fève that is placed in the filling near the border.  For those who are more safety conscious, you can use a piece of dried fruit in place of the fève.

Brush some water along the ring of the filling.  

Take the second refigerated puff pastry out and place it directly over the filled puff pastry you are working with.

Press down, moving around the edge of the filling to seal it. 

Lift up silicone baking sheet or parchment paper with the pastry on it and flip it over upside down to another baking sheet. 

Take the sharp tip of a knife, holding it horizontilly, tap into the edges around the pastry.  This helps to seal the puff pastry together. 

Brush a layer of egg wash over the top and then refigerate for 20 minutes.  Take it out and then give it a second brushing of egg wash.   Then use the tip of a paring knife to carve gently into the puff pastry to decorate.

Poke holes using the paring knife all around the top of the pastry avoiding the center before placing in the oven to bake.  Remember to start off at 180°C and continue to bake down to 145°C as noted above.

Optional: You can glaze your baked cake with maple syrup or chestnut syrup to give it beautiful sheen.

NOTE

This recipe comes from Chef Nicolas Bernardé.  You can watch him making it and maybe practice your French at the same time?  For my egg wash I added some water to thin it out so that the glaze doesn't have too much of an eggy look on top of my cake.  My baking time was only an hour.  He states 1 hour 20 minutes.  I also didn't put the finishing glaze on my baked king cake since I think the almond filling is sweet enough for my family.  It also prevents those potential sticky little fingers from getting all over the place.


White Asparagus and Fennel Butter

White asparagus with compound fennel butter.

I must be missing NYC these days.  There are loads of recipes on how to cook white asparagus but the one that caught my eye was the one from Prune restaurant in the East Village.  My first thought was "Oh my gosh, it's still there".  Bits of NYC establishments are slowly being erased from when I knew it due to rent increase.  I get a pang in my heart when I read about any old haunts of mine closed down to be replaced by global retail or supermarket chains.  So happy to see that Prune is alive and kicking. 

Watch Martha Stewart and chef Gabrielle Hamilton of Prune restaurant making this delicious asparagus starter.

White Asparagus and Fennel Butter

INGREDIENTS//serves 2-3

• 1 bunch fresh white asparagus
• 1 lemon, divided (zest in compound butter and juice for asparagus)

COMPOUND BUTTER

• 1 stick unsalted butter, softened
• 1 whole fennel, finely sliced (including fronds, chopped)
• Lemon zest
• Pinch of salt
• Dash of pastis liquor

INSTRUCTIONS

To prepare your asparagus, snap off the stems where it naturally breaks and peel off the tough skin.

Prepare the lemon zest using a microplane or a flat or box grater with fine holes.  Then use the remainder of the lemon for juice you'll add into the pot of boiling water to cook the asparagus.  Save some juice to be squeezed just before serving the dish.

I don't have an asparagus cooker/steamer so I bundle the asparagus together with parcel string and I cook it in a pot.  Tie the parcel string around the bottom of the bunch of asparagus and tie further up to hold the asparagus in place so that it tries to stand.  To keep the asparagus in place and standing in the pot, brace it with two long skewers through the bundle of asparagus (cross through the bundle with a skewer forming an "X"). 

In a pot, add about 4 inches of water or enough so that the base of the asparagus will be covered.   Squeeze lemon juice and add salt to the water.  Bring it to a boil.

Add the asparagus and cover with a lid for about 30 minutes.  Make sure the asparagus is nice and soft and that the tips are steamed. 

Strain the asparagus, let it cool and serve on a plate with shavings of the fennel butter.  Drizzle some olive oil for extra delicious fat and salt to taste with a squeeze of lemon.

COMPOUND BUTTER

Finely slice your fennel and chop up the fronds. 

Heat 2 tablespoons of butter in a pan and caramelize your fennel for about 30 minutes on medium heat letting the natural sugars come out on its own.  During this time add whole of lemon zest to the fennel and add the fronds. Then add some salt and pepper.

When caramelized, splash a dash of pastis liquor and ignite it.  When the flame burns out let the fennel cool down. 

After cooling, in a food processor add your fennel and chop it down until fine.  Then take the rest of your softened butter and add in chunks at a time. 

Remove butter compound mixture from bowl and spoon onto parchment paper or plastic wrap and roll into a log.  Put it in the freezer until ready to use in a plastic ziplock bag to keep it airtight.  Use a mandoline or the large hole-side of a box grater for butter shavings.


Spruced Up Ginger Biscuits

I've got an English friend.  We'll call her "Lady Jo" or "LJ" for short, although it could have been "Trucker Jo."  This was her husband's pick-up line when he met her: "Oh, Jo?  Like an American trucker Jo?"  Yes—and that actually worked.  They've been happily together for 20+ years now.

Lady Jo is so beautifully British especially with that accent of hers.  She can tell anyone to shut up without sounding offensive and she always totes a thermos full of tea tucked away for tea time.  She is whom I go to for baking advice because she's got an aunt with creds whom she goes to for baking advice.  One day, LJ popped over with this recipe in hand and the gingerbread man cutter in the other.  What a delightful surprise for me!  Ever since then,  I haven't stopped making them.  My kids are kept busy individualizing their gingerbread men and I look forward to dunking them in my cuppa.  Merry holidays everyone! 

GInger Biscuits (nude)

INGREDIENTS//yields 25

• 350 grams plain flour
• 1/2 heaping teaspoon ground ginger
• 1/2 level teaspoon bicarbonate of soda (baking soda)
• 150 grams butter
• 175 grams golden syrup
• 150 grams sugar (I use brown sugar)

INSTRUCTIONS

Sieve the first three ingredients together.  Then rub in the butter.

Heat the golden syrup in a small pan until runny, add the sugar and stir until it dissolves.

Add it to the dry mixture and mix well. 

Roll into walnut size balls and arrange it on a tray leaving enough space in between each biscuit dough.

Bake for 15-20 minutes at 165° depending on size of biscuit.  Let it cool and then lift it off the tray with a spatula.

Optional:  Decorate at your own creative will.

NOTE

I usually roll the dough up in balls much larger than walnut size for the gingerbread man.  Depending on the size of your gingerbread man cutter or other shaped cookie cutters you'll have to roll up enough dough so that when you flatten it, it spreads out enough for the cookie cutter to fit.  Oven time varies for size and thickness of your cookies.  I used a 4 1/2 inch length gingerbread man cutter and rolled it out about 1/4 inch thick.  I left it in the oven for 15 minutes.  These are the hard, crunchy English style biscuits.

Beetroot Hummus Dip

Living under the influence of a little girl, the color pink has made its way onto my table.  I never thought of my daughter as a pink kind of girl.  She's the kind that jumps into a mud hole and has uncontrollable laughs when she's covered in dirt.  She eats her whole carrot stick with a grip so hard, no one can pry it away from her even if your life depended on it.  She enjoys wrestling her brother to the ground, screaming at the top of her lungs, and coming home with grass stains on each and every possible limb.  Yet, she also loves to dress in pink and eat anything pink.  Preferably a cloud fluffy full of cotton candy pink.

This is dedicated to my little girl.  A variation to the basic hummus recipe that includes a veggie, the beetroot!  Any extra veg I can get in a day makes me feel good.  I have snuck this one into the hummus dip.  No secret about it, the color itself screams out loud.  It's an eye-popper and attention grabber that's perfect for parties.  I like to have this for breakfast, lunch or a snack on a piece of whole grain bread with slices of avocado and black radish.  So does Mila, but sans radis for now.

Beetroot Hummus Dip

PREPARATION

Soak the dried chickpeas overnight with a cover.  Be sure to add more than enough water to cover the chickpeas because they swell up to almost double their size. 

INGREDIENTS//yields 2.5 cups

• 1 cup dried chickpeas (yields about 3 cups cooked, 1 cup cooked=150 grams)
• 2.5 cloves garlic
• 1.5 teaspoons cumin
• 1.5 teaspoons sea salt (adjust accordingly to personal taste)
• 3.5 tablespoons tahini paste
• 1 small beetroot (boiled until soft), about 70 grams
• 1.5 lemon, juiced
• Olive oil, drizzle

INSTRUCTIONS

Drain and transfer your soaked chickpeas to a large cooking pot.  Fill it up with water with about an inch or two to cover. 

Bring it to a boil and then turn down the heat to a slow simmer for at least two hours.  If you see some white foam during this time, just scoop it out.  Taste check every 10 minutes afterwards to see if is firm enough on the outside and tender on the inside.  Next drain and rinse them under cold water. 

Optional:  I have heard of people peeling skin off of each and every chickpea before adding it into the food processor.  Apparently, the dip comes out smoother.  I don't know.  I never seem to have the time to do this.

Add all your ingredients into the food processor and turn it on.  Use your spatula to swipe along the sides occasionally so that you get every bit of it to blend together for a smooth consistency.  You can add water to the batch if it is too thick. 

Top it off with a generous drizzle of olive oil.

NOTE

I am a garlic fan.  I like my hummus and beetroot hummus with a sharp garlicky taste and a slight citrusy twang to it.  If you want a milder recipe just use 2 cloves of garlic and the sweet flavor of the beetroot will come through.  Add enough water as needed to achieve the consistency you like.  I added nearly a half cup of water to this recipe.
 

Heartwarming Red Split Lentil Soup

RedLentilSoup.jpg

Brrr, winter season is right around the corner and this soup fills me up and keeps me nice and toasty.  One of the best things I love about Paris is that it is full of ethnic diversities.  You can find pockets of many ethnic communities spread thoughout this city.  I love the idea of being able to dash over to the 15th arrondisement just to pick up a date syrup at a Persian grocery store.  This is where you will find a restaurant row of Persian cuisine and grocery stores a.k.a Petite Perse or Little Téhéran.  As I enter the grocery store, my sensory receptors are instantly heightened, things seem foreign and I am intrigued.  This is where I can easily pass an hour picking up every jar and package to decipher its labels, discover ingredients and wonder how these things are used.  What gives me pleasure is the feeling of having purchased my date syrup straight from Persia—minus the cost of airfare and flight time!  I appreciate every drop of syrup that comes out of the jar because I know it has traveled a long way.  Plus, it's a nice conversation piece.  "Oh, the date syrup? I bought that from  ̶P̶e̶r̶s̶i̶a̶,  umm—I mean the Persian grocers in the 15th..."

I can carry on about other goodies that I buy from Litte Africa (Chateau Rouge in the 18e), Chinatown (Ave de Choisy in the 13e, Arts et Métiers in the 3e, Belleville in the 10e, and Little Tokyo (rue St. Anne in the 1er and 2e) but it'll be a long list.  Today I was in La Chapelle (Little India in the 10e) for a baby bump portrait session.   I was early so I picked up some mangoes and red split lentils for this recipe and made a pit stop at the no-frills Indian take-out joint for its chai.  With my hands cupped around the chai, I stepped out in the cold and hovered over it.   I took in the scent of spices wafting up from my masala chai, lifting my head towards the streets in front of me and with a long exhalation felt removed from wherever it is that I come from.  It didn't matter. 
Today, I was in India.

Red Split Lentil Soup


INGREDIENTS//serves 6

• 1 tablespoon of olive oil
• 3 carrots, diced
• 2 stalks celery, diced
• 1 onion, diced
• 1 clove garlic, minced
• 1 bay leaf
• 1.5 teaspoons coarse salt (adapt according to taste)
• 2 teaspoons cumin seeds
• 1 tablespoon tomato paste
• 1.5 liters vegetable or chicken broth
• 2 cups lentil (red or yellow split lentils)
• 1/2 teaspoon curry powder
• 1/2 teaspoon curcuma (or tumeric powder)
• Bunch of fresh coriander (cilantro)
• 1 wedge of lime

INSTRUCTIONS

Heat the olive oil over medium heat in a medium Dutch oven or heavy pot.  Then add the diced carrots, celery, onion, minced garlic and bay leaf.  Add some salt and mix.  Cover the pot and let it cook for 5 minutes.  

Uncover and add the cumin seeds, stirring it around.  Then add the tomato paste, the liter of vegetable broth and lentils.  Bring it to a boil. 

Turn down the heat to a low simmer.  Add the curry powder and curcuma.  Cover and let it simmer for about         15 minutes or until the lentils are soft. 

I usually take a cup of the soup and pour it in the blender with a small handful of fresh coriander.  Then I stir this back in with the rest of the pot.  It gives it a chunkier consistency.  Squeeze a bit of lime and garnish with fresh coriander.

NOTE

It's kind of a cross between lentil soup and lentil curry.  You can add more liquid to it for a soupier mix or less liquid for a thicker consistency.  If you opt for the thicker consistency, you can top it over some basmati rice for a more filling and curry like meal.

P.S.  I just had to throw this one in the mix...


Cannelés Bordelais

CannelesBordelais.jpg

I have a deep affection for this sweet pastry.  It was introduced to me when I arrived in France 10 years ago at a dinner in my friend's apartment.  We didn't speak much of each other's languages at the time but I figured I should be the one making the effort since I was living in her country.   Mainly I was impressed by her incredible patience in listening to my very broken French and with her subtle corrections—which proves she was actually listening to me—encouraging me to carry on as if I was fluent as a singing bird (mind you, wine was involved).   Then she won me over as she came out with a beautiful plate of cannelés bordelais.  I bit into one and fell in love.  I never had anything like this texture.  A thick caramelized chewy crust with a soft, moist custard center.  I had to know how to make it.   The next time I saw Sandrine—my quintessential French friend, with her Jean Seberg styled crop and pretty make-up free face—she gifted me the recipe and the particular mold the cannéles are baked in.  It was the perfect, thoughtful gift with a French touch.  I am sharing a song by Étienne Daho, another cultural lesson well learned by her.  So when you take out your tray of baked cannelés to Étienne Daho's whispery voice in the back, top it off with a "voilà" and suddenly we feel so à la française!

Cannelés Bordelais

PREPARATION TIME

15 minutes plus an hour of refigeration time, even overnite if you want to prepare ahead.

BAKE TIME

1 hour

INGREDIENTS//yields 16

• 1/2 liter whole milk (2cups)
• 1/2 stick vanilla (slit lengthwise)
• 2 egg yolks
• 2 whole eggs
• 250 grams powdered sugar (2 cups)
• 100 grams flour (3/4 cup)
• 50 grams butter (3.6 tablespoons)
• 1 tablespoon rhum

INSTRUCTIONS

Heat the milk and infuse the vanilla stick in the hot milk.  Once it starts to boil, turn off the heat and cover the pot.  Set it aside to cool. 

Melt the butter and let it cool. 

In a medium size mixing bowl, combine the flour and sugar.

In a separate bowl,  whisk the eggs together (the whole eggs and the egg yolks).  Then add it to the sugar and flour mix.  You can stir by hand or by mixer until its consistency becomes slightly thick and smooth. 

Take the vanilla stick out of the cooled down milk and add it to the flour, sugar, and egg combination.  Continue to stir everything together.

Add the butter, and continue to mix in the rhum.

Let the batter sit an hour in the fridge or even overnight.  You will find that the batter settles a bit at the bottom after refigerating.  Just stir it gently and then fill the cannelés mold up half way.  Place in oven for an hour at 350° F or 180° C.   I usually check the crust while it's in the oven.  I like it when the crust gets more than golden brown.  When it's done, take it out of the oven and let it cool. Voilà!